Adapt Customer Interface with Corporate Identity
In OTOBO it is very easy to adapt the customer area to your own corporate identity. Follow this tutorial step by step and OTOBO will shine in your own design in a short time.
Note
Currently, it is not so easy to adapt the agent area to one’s own CI.
Changes in the OTOBO .css files would be necessary here.
One exception is the logo on the agent login page and the agent header.
The logos can be easily exchanged by copying the logos to the server and then adjusting the options AgentLoginLogo and AgentLogo under Admin -> System Configuration.
Change Colors in Customer Area
To change the colors for the OTOBO customer interface, please go to Admin -> System Configuration and change the following settings:
CustomerColorDefinitionsTo change the colors on the Customer Dashboard, please go to
Admin -> System Configurationand search forCustomerDashboard. In the search result you will find all the options you need with color definitions.
Change Logos and Pictures
In the first step please copy your Logos and Pictures to the OTOBO Server.
Please use an SCP client (e.g., WinSCP) for this purpose.
Often you do not have the permissions to copy the logos to the right place.
In this case, it is best to use the folder /tmp.
In the next step copy the logo into the OTOBO home directory:
# Using OTOBO Docker Installation
otobo_admin> docker cp /tmp/logo.png otobo_web_1:/opt/otobo/var/httpd/htdocs/skins/Customer/default/img/

# Nativ installation in /opt/otobo
otobo_admin> cp /tmp/logo.png /opt/otobo/var/httpd/htdocs/skins/Customer/default/img/
The next sections describe the changes required in the OTOBO Agent Interface.
Change Customer Login Pictures and Text
Navigate to Admin -> System Configuration and change the following settings.
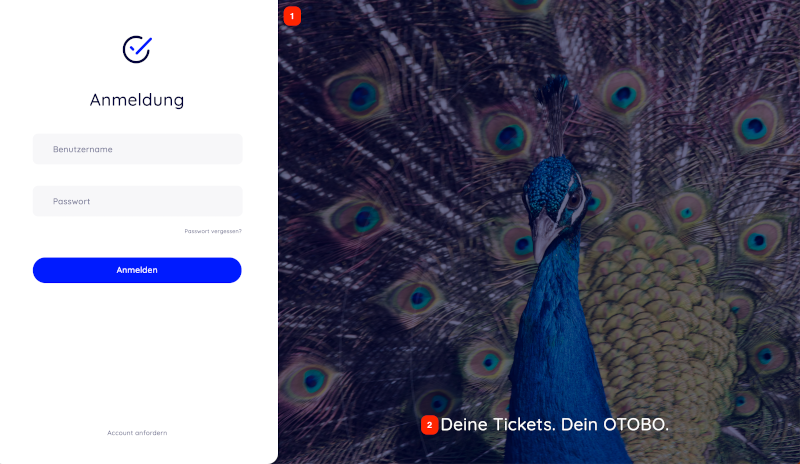
1 and 2 - System Configuration option CustomerLogin::Settings
Remove Opacity and Watermark
Note
At the moment it is not possible to remove the overlay and watermark used in the image on the right by system configuration.
To remove the opacity, please adjust the option #oooLoginBG > .oooBG in the file var/httpd/htdocs/skins/Customer/default/css/Core.Login.css:
 #oooLoginBG > .oooBG {
    position: relative;
    width: 100%;
    height: 100%;
 /*   opacity: 0.45; Disable opacity */
    background-size: cover;
    overflow: hidden;
}
To remove the watermark, please remove the following line inside the file Kernel/Output/HTML/Templates/Standard/CustomerLogin.tt:
<!-- start login -->
<div id="oooLoginBG">
    <div class="oooBG" style="background-image: url([% Data.Background | html %]);">
<!-- remove this line: <div id="oooBGSignet" style="background-image: url([% Config("Frontend::WebPath") %]common/img/otobo-signet_border.svg);"></div> -->
    </div>
    <h1>[% Translate(Data.LoginText) | html %]</h1>
</div>
Note
Please add the files to a OPM package in the next step, so that the changes remain persistent. You can find instructions on how to do this in our Admin Manual: https://doc.otobo.org/manual/developer/11.0/en/content/how-to-publish-otobo-extensions.html
Change Customer Dashboard Tiles and Options
To change the colors on the Customer Dashboard, please go to Admin -> System Configuration and search for CustomerDashboard.
In the search result you will find all the options you need with color definitions.

1 - To change the picture, link and text please use the System Configuration option
CustomerDashboard::Tiles###FeaturedLink-012 - To change the toplevel text please use the System Configuration option
CustomerDashboard::Configuration::Text
Note
Please disable the configuration options from not needed tiles.