Kundenbenutzer
Eine Aufzeichnung darüber, mit wem sich Ihr Unternehmen befasst, erfordert weitere Informationen über diese Person: Den physischen Standort für Versand- und Rechnungszwecke sowie Kontaktinformationen für E-Mail- und Telefonkontakt.
OTOBO bietet eine großartige Möglichkeit, individuelle Informationen über Kontakte innerhalb von Unternehmen zu speichern. Sie können beliebig viele persönliche Verbindungen zu OTOBO hinzufügen.
Verwenden Sie diese Ansicht, um einen customer user zum System hinzuzufügen. Eine OTOBO-Neuinstallation enthält standardmäßig keine Kundenbenutzer. Die Ansicht zur Verwaltung der Kundenbenutzer ist im Modul Kundenbenutzer in der Gruppe Benutzer, Gruppen und Rollen verfügbar.
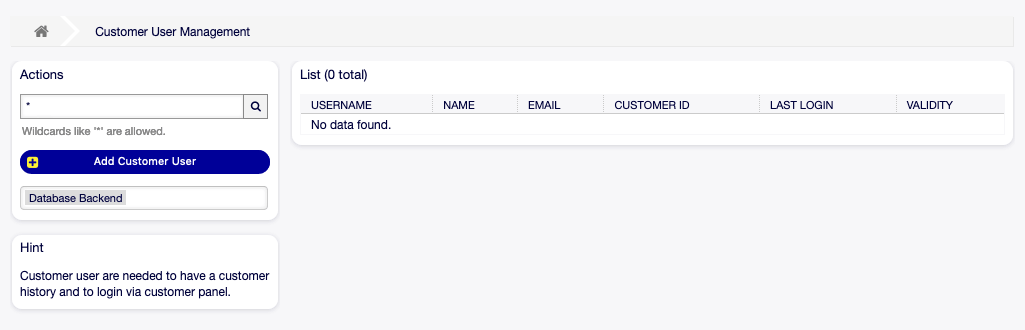
Kundenbenutzer-Verwaltung
Kundenbenutzer verwalten
Warnung
Ein Kundenbenutzer kann dem System nur hinzugefügt werden, wenn wenigstens ein Kunde existiert. Erstellen Sie zuerst einen oder mehrere Kunden.
Bemerkung
Das Hinzufügen oder Bearbeiten eines Kundenbenutzers ist nur über das Datenbank-Backend möglich. Die Verwendung externer Verzeichnisdienste wie LDAP deaktiviert die Benutzerverwaltung des Kunden.
So fügen Sie einen Kundenbenutzer hinzu:
- Klicken Sie in der linken Seitenleiste auf die Schaltfläche Kundenbenutzer hinzufügen.
- Füllen Sie die Pflichtfelder aus.
- Klicken Sie auf die Schaltfläche Speichern.
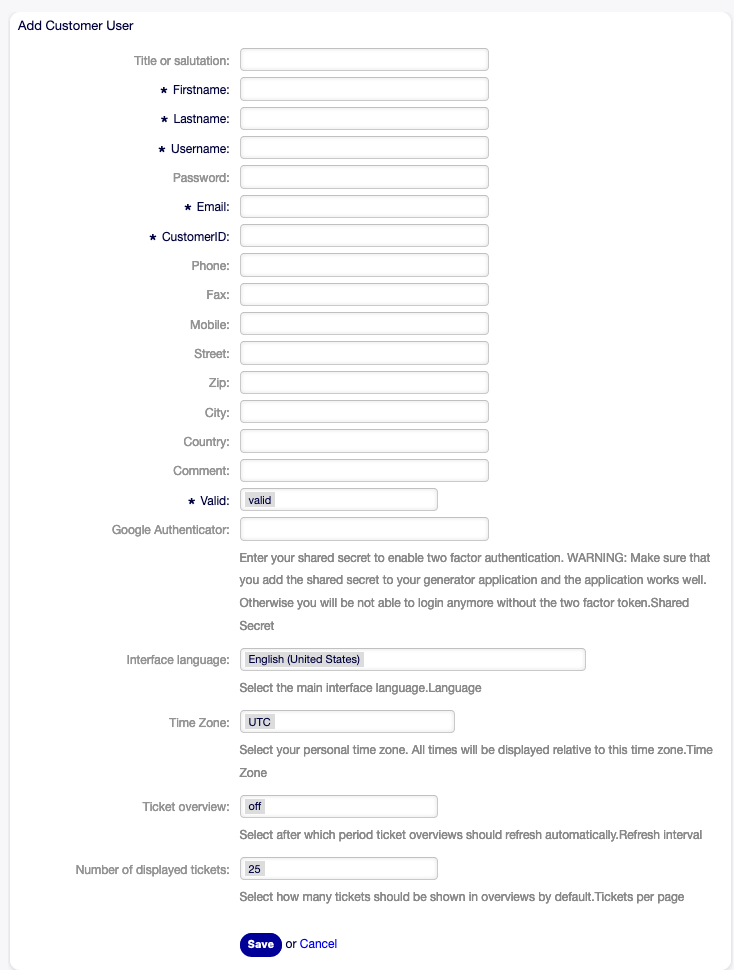
Kundenbenutzer hinzufügen
Warnung
Kundenbenutzer können nicht aus dem System gelöscht werden. Sie können nur deaktiviert werden, wenn die Einstellung Gültigkeit auf ungültig oder ungültig-temporär gesetzt wird.
So bearbeiten Sie einen Kundenbenutzer:
- Klicken Sie in der Liste mit den Kundenbenutzern auf einen Kundenbenutzer.
- Ändern Sie die Felder.
- Klicken Sie auf die Schaltfläche Speichern oder Speichern und abschließen.
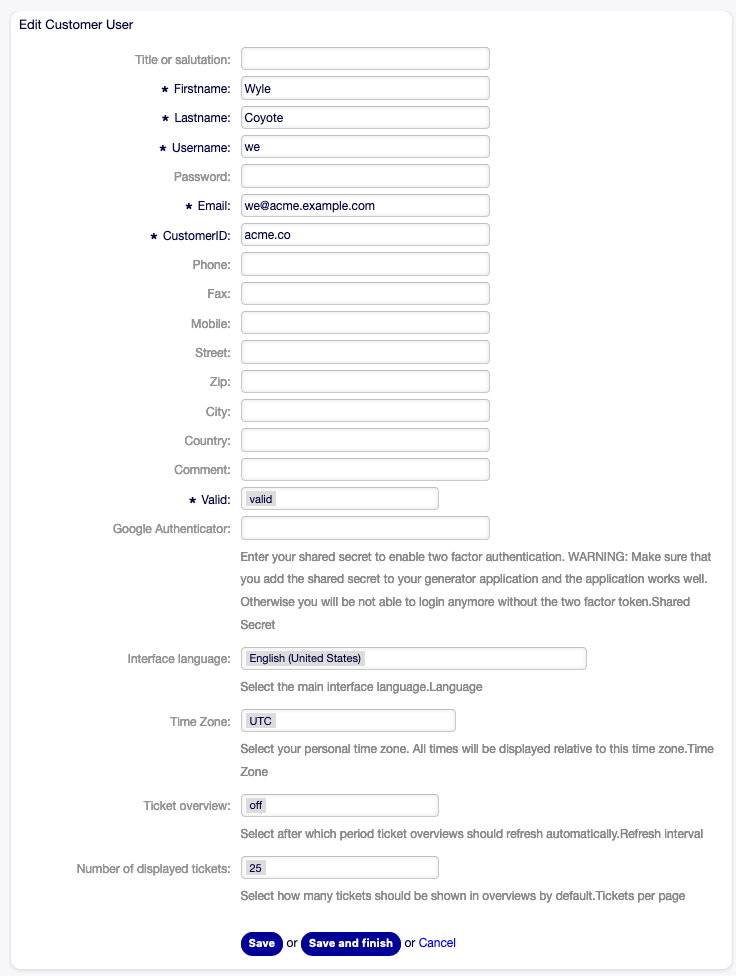
Kundenbenutzer bearbeiten
So finden Sie einen Kundenbenutzer:
- Geben Sie einen Suchbegriff in das Suchfeld in der linken Seitenleiste ein.
- Klicken Sie auf das Lupen-Symbol oder betätigen Sie
Eingabe.
Bemerkung
Wenn dem System mehrere Kundenbenutzer hinzugefügt wurden, nutzen Sie das Suchfeld, um einen einzelnen Kunden zu finden. Standardmäßig werden nur die ersten 1000 Kundenbenutzer angezeigt.
Die Berechtigungen des Agenten können gesteuert werden, indem ein Kunde oder Kundenbenutzer zu Gruppen hinzugefügt wird. Dies kann zu einer komplexen Matrix von Berechtigungen führen. Die effektiven Berechtigungen für einen Kundenbenutzer können unten auf der Ansicht Kundenbenutzer bearbeiten überprüft werden.
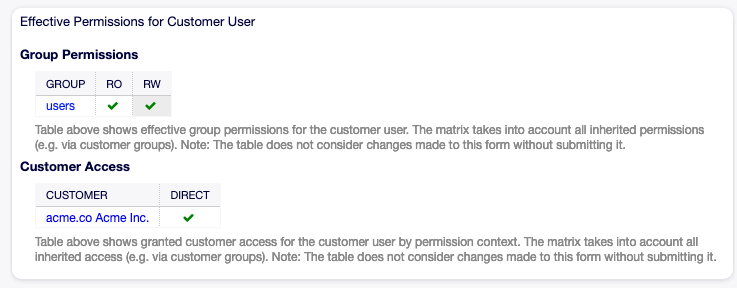
Effektive Berechtigungen für Kunde
Siehe auch
Kundenbenutzer ↔ Gruppen muss aktiviert sein, um diese Funktion zu nutzen.
Einstellungen für Kundenbenutzer
Die folgenden Einstellungen sind verfügbar, wenn Sie diese Ressource hinzufügen oder bearbeiten. Die mit einem Sternchen gekennzeichneten Felder sind Pflichtfelder.
Bemerkung
Dies sind die Standardfelder, die für die interne Datenbank-Tabelle zur Verfügung stehen.
- Titel oder Anrede
- Hier können einige Präfixe, wie bspw. Dr. oder Prof. etc. hinzugefügt werden.
- Vorname *
- Der Vorname des Kundenbenutzers.
- Nachname *
- Der Nachname des Kundenbenutzers.
- Benutzername *
- Der Benutzername des Kundenbenutzers zur Anmeldung am System.
- Passwort
- Das Passwort des Kundenbenutzers. Wird automatisch generiert, wenn das Feld leer gelassen wird.
- E-Mail *
- Die E-Mail-Adresse des Kundenbenutzers.
- CustomerID *
- The ID of the customer company the customer user belongs to. Select a customer from the list of Kunden.
- Telefon
- Die Telefonnummer des Kundenbenutzers.
- Fax
- Die Faxnummer des Kundenbenutzers.
- Mobiltelefon
- Die Handynummer des Kundenbenutzers.
- Straße
- Der Straßenname der Adresse des Kunden.
- PLZ
- Die PLZ der Adresse des Kunden.
- Stadt
- Die Stadt der Adresse des Kunden.
- Land
- Das Land des Kundenbenutzers.
- Kommentar
- Fügen Sie dieser Ressource zusätzliche Informationen hinzu. Es wird empfohlen, dieses Feld als Beschreibung der Ressource zur besseren Übersichtlichkeit immer mit einem vollständigen Satz zu füllen, da der Kommentar auch in der Übersichtstabelle angezeigt wird.
- Gültig *
- Setzt die Gültigkeit dieser Ressource. Jede Ressource kann nur in OTOBO verwendet werden, wenn dieses Feld auf gültig gesetzt ist. Wenn Sie dieses Feld auf ungültig oder ungültig-temporär setzen, wird die Nutzung der Ressource deaktiviert.
Siehe auch
It is possible to assign multiple customers to customer users via the Kundenbenutzer ↔ Kunden screen.
Customer User Back Ends
The system works with many customer user data attributes such as username, email address, phone number, etc. These attributes are displayed in both the agent and the external interface, and also used for the authentication of customer users.
Customer data used or displayed within the system is highly customizable. The user login and the email address are always needed for customer authentication.
You can use two types of customer back end: database or LDAP. If you already have another customer back end (e.g. SAP), it is possible to write a module that uses it.
The administrator interface does not support the configuration of external back ends. Administrators need to edit the file Kernel/Config.pm by copying and pasting code snippets from Kernel/Config/Defaults.pm manually.
Warnung
Do not modify the file Kernel/Config/Defaults.pm, it will be overwritten after upgrading the system! Copy and paste the code snippets into Kernel/Config.pm instead.
Database
This is the default customer user back end for new installations. The example below shows the configuration of a database customer back end, which uses customer user data stored in the database table customer_user.
    # CustomerUser
    # (customer user database backend and settings)
    $Self->{CustomerUser} = {
        Name   => Translatable('Database Backend'),
        Module => 'Kernel::System::CustomerUser::DB',
        Params => {

            # if you want to use an external database, add the
            # required settings
#            DSN  => 'DBI:odbc:yourdsn',
#            Type => 'mssql', # only for ODBC connections
#            DSN => 'DBI:mysql:database=customerdb;host=customerdbhost',
#            User => '',
#            Password => '',
            Table => 'customer_user',
#            ForeignDB => 0,    # set this to 1 if your table does not have create_time, create_by, change_time and change_by fields

            # CaseSensitive defines if the data storage of your DBMS is case sensitive and will be
            # preconfigured within the database driver by default.
            # If the collation of your data storage differs from the default settings,
            # you can set the current behavior ( either 1 = CaseSensitive or 0 = CaseINSensitive )
            # to fit your environment.
            #
#            CaseSensitive => 0,

            # SearchCaseSensitive will control if the searches within the data storage are performed
            # case sensitively (if possible) or not. Change this option to 1, if you want to search case sensitive.
            # This can improve the performance dramatically on large databases.
            SearchCaseSensitive => 0,
        },

        # customer unique id
        CustomerKey => 'login',

        # customer #
        CustomerID    => 'customer_id',
        CustomerValid => 'valid_id',

        # The last field must always be the email address so that a valid
        #   email address like "John Doe" <john.doe@domain.com> can be constructed from the fields.
        CustomerUserListFields => [ 'first_name', 'last_name', 'email' ],

#        CustomerUserListFields => ['login', 'first_name', 'last_name', 'customer_id', 'email'],
        CustomerUserSearchFields           => [ 'login', 'first_name', 'last_name', 'customer_id' ],
        CustomerUserSearchPrefix           => '*',
        CustomerUserSearchSuffix           => '*',
        CustomerUserSearchListLimit        => 250,
        CustomerUserPostMasterSearchFields => ['email'],
        CustomerUserNameFields             => [ 'title', 'first_name', 'last_name' ],
        CustomerUserEmailUniqCheck         => 1,

#        # Configures the character for joining customer user name parts. Join single space if it is not defined.
#        # CustomerUserNameFieldsJoin => '',

#        # show now own tickets in customer panel, CompanyTickets
#        CustomerUserExcludePrimaryCustomerID => 0,
#        # generate auto logins
#        AutoLoginCreation => 0,
#        # generate auto login prefix
#        AutoLoginCreationPrefix => 'auto',
#        # admin can change customer preferences
#        AdminSetPreferences => 1,
        # use customer company support (reference to company, See CustomerCompany settings)
        CustomerCompanySupport => 1,
        # cache time to live in sec. - cache any database queries
        CacheTTL => 60 * 60 * 24,
#        # Consider this source read only.
#        ReadOnly => 1,
        Map => [

            # Info about dynamic fields:
            #
            # Dynamic Fields of type CustomerUser can be used within the mapping (see example below).
            # The given storage (third column) then can also be used within the following configurations (see above):
            # CustomerUserSearchFields, CustomerUserPostMasterSearchFields, CustomerUserListFields, CustomerUserNameFields
            #
            # Note that the columns 'frontend' and 'readonly' will be ignored for dynamic fields.

            # note: Login, Email and CustomerID needed!
            # var, frontend, storage, shown (1=always,2=lite), required, storage-type, http-link, readonly, http-link-target, link class(es)
            [ 'UserTitle',        Translatable('Title or salutation'), 'title',          1, 0, 'var', '', 0, undef, undef ],
            [ 'UserFirstname',    Translatable('Firstname'),           'first_name',     1, 1, 'var', '', 0, undef, undef ],
            [ 'UserLastname',     Translatable('Lastname'),            'last_name',      1, 1, 'var', '', 0, undef, undef ],
            [ 'UserLogin',        Translatable('Username'),            'login',          1, 1, 'var', '', 0, undef, undef ],
            [ 'UserPassword',     Translatable('Password'),            'pw',             0, 0, 'var', '', 0, undef, undef ],
            [ 'UserEmail',        Translatable('Email'),               'email',          1, 1, 'var', '', 0, undef, undef ],
#            [ 'UserEmail',        Translatable('Email'),               'email',          1, 1, 'var', '[% Env("CGIHandle") %]?Action=AgentTicketCompose;ResponseID=1;TicketID=[% Data.TicketID | uri %];ArticleID=[% Data.ArticleID | uri %]', 0, '', 'AsPopup OTOBOPopup_TicketAction' ],
            [ 'UserCustomerID',   Translatable('CustomerID'),          'customer_id',    0, 1, 'var', '', 0, undef, undef ],
#            [ 'UserCustomerIDs',  Translatable('CustomerIDs'),         'customer_ids',   1, 0, 'var', '', 0, undef, undef ],
            [ 'UserPhone',        Translatable('Phone'),               'phone',          1, 0, 'var', '', 0, undef, undef ],
            [ 'UserFax',          Translatable('Fax'),                 'fax',            1, 0, 'var', '', 0, undef, undef ],
            [ 'UserMobile',       Translatable('Mobile'),              'mobile',         1, 0, 'var', '', 0, undef, undef ],
            [ 'UserStreet',       Translatable('Street'),              'street',         1, 0, 'var', '', 0, undef, undef ],
            [ 'UserZip',          Translatable('Zip'),                 'zip',            1, 0, 'var', '', 0, undef, undef ],
            [ 'UserCity',         Translatable('City'),                'city',           1, 0, 'var', '', 0, undef, undef ],
            [ 'UserCountry',      Translatable('Country'),             'country',        1, 0, 'var', '', 0, undef, undef ],
            [ 'UserComment',      Translatable('Comment'),             'comments',       1, 0, 'var', '', 0, undef, undef ],
            [ 'ValidID',          Translatable('Valid'),               'valid_id',       0, 1, 'int', '', 0, undef, undef ],

            # Dynamic field example
#            [ 'DynamicField_Name_X', undef, 'Name_X', 0, 0, 'dynamic_field', undef, 0, undef, undef ],
        ],

        # default selections
        Selections => {

#            UserTitle => {
#                'Mr.' => Translatable('Mr.'),
#                'Mrs.' => Translatable('Mrs.'),
#            },
        },
    };
If you want to customize the customer user data, change the columns or add new ones to the customer_user table in the database.
For example, to add a new field for room number:
Add a new column
roomto tablecustomer_user.MySQL or MariaDB:
root> mysql -u root -p -e 'ALTER TABLE otobo.customer_user ADD room VARCHAR (250)'PostgreSQL (from the
/opt/otobodirectory):otobo> psql -c 'ALTER TABLE customer_user ADD COLUMN room varchar(250)'Copy the
$Self->{CustomerUser}section fromKernel/Config/Defaults.pmintoKernel/Config.pm.Add the new column to the
Maparray.[ 'UserRoom', 'Room', 'room', 0, 1, 'var', '', 0, undef, undef ],
You can set the HTTP link target and link class (the last two keys) to
undefin map array elements, if they are not to be used. These keys addtarget=""andclass=""attributes to the HTTP link element, respectively. They are ignored if HTTP link is not set (it is''in this example).Bemerkung
It is recommended to always use English words for names.
Siehe auch
Names can be translated into other languages with custom translation files. See the Custom Translation File chapter in the developer manual.
LDAP
If you have an LDAP directory with your customer user data, you can use it as the customer user back end. The example below shows the configuration of a LDAP customer user back end.
# CustomerUser
# (customer user ldap backend and settings)
    $Self->{CustomerUser} = {
        Name => 'LDAP Backend',
        Module => 'Kernel::System::CustomerUser::LDAP',
        Params => {
            # ldap host
            Host => 'bay.csuhayward.edu',
            # ldap base dn
            BaseDN => 'ou=seas,o=csuh',
            # search scope (one|sub)
            SSCOPE => 'sub',
            # The following is valid but would only be necessary if the
            # anonymous user does NOT have permission to read from the LDAP tree
            UserDN => '',
            UserPw => '',
            # in case you want to add always one filter to each ldap query, use
            # this option. e. g. AlwaysFilter => '(mail=*)' or AlwaysFilter => '(objectclass=user)'
            AlwaysFilter => '',
            # if the charset of your ldap server is iso-8859-1, use this:
#            # SourceCharset => 'iso-8859-1',
            # die if backend can't work, e. g. can't connect to server
            Die => 0,
            # Net::LDAP new params (if needed - for more info see perldoc Net::LDAP)
            Params => {
                port    => 389,
                timeout => 120,
                async   => 0,
                version => 3,
            },
        },
        # customer unique id
        CustomerKey => 'uid',
        # customer #
        CustomerID => 'mail',
        CustomerUserListFields => ['cn', 'mail'],
        CustomerUserSearchFields => ['uid', 'cn', 'mail'],
        CustomerUserSearchPrefix => '',
        CustomerUserSearchSuffix => '*',
        CustomerUserSearchListLimit => 250,
        CustomerUserPostMasterSearchFields => ['mail'],
        CustomerUserNameFields => ['givenname', 'sn'],
        # Configures the character for joining customer user name parts. Join single space if it is not defined.
        CustomerUserNameFieldsJoin => '',
        # show customer user and customer tickets in the external interface
        CustomerUserExcludePrimaryCustomerID => 0,
        # add a ldap filter for valid users (expert setting)
#        # CustomerUserValidFilter => '(!(description=gesperrt))',
        # admin can't change customer preferences
        AdminSetPreferences => 0,
        # cache time to live in sec. - cache any ldap queries
#        CacheTTL => 0,
        Map => [
            # note: Login, Email and CustomerID needed!
            # var, frontend, storage, shown (1=always,2=lite), required, storage-type, http-link, readonly, http-link-target, link class(es)
            [ 'UserTitle',       Translatable('Title or salutation'), 'title',               1, 0, 'var', '', 1, undef, undef ],
            [ 'UserFirstname',   Translatable('Firstname'),           'givenname',           1, 1, 'var', '', 1, undef, undef ],
            [ 'UserLastname',    Translatable('Lastname'),            'sn',                  1, 1, 'var', '', 1, undef, undef ],
            [ 'UserLogin',       Translatable('Username'),            'uid',                 1, 1, 'var', '', 1, undef, undef ],
            [ 'UserEmail',       Translatable('Email'),               'mail',                1, 1, 'var', '', 1, undef, undef ],
            [ 'UserCustomerID',  Translatable('CustomerID'),          'mail',                0, 1, 'var', '', 1, undef, undef ],
            # [ 'UserCustomerIDs', Translatable('CustomerIDs'),         'second_customer_ids', 1, 0, 'var', '', 1, undef, undef ],
            [ 'UserPhone',       Translatable('Phone'),               'telephonenumber',     1, 0, 'var', '', 1, undef, undef ],
            [ 'UserAddress',     Translatable('Address'),             'postaladdress',       1, 0, 'var', '', 1, undef, undef ],
            [ 'UserComment',     Translatable('Comment'),             'description',         1, 0, 'var', '', 1, undef, undef ],

            # this is needed, if "SMIME::FetchFromCustomer" is active
            # [ 'UserSMIMECertificate', 'SMIMECertificate', 'userSMIMECertificate', 0, 1, 'var', '', 1, undef, undef ],

            # Dynamic field example
            # [ 'DynamicField_Name_X', undef, 'Name_X', 0, 0, 'dynamic_field', undef, 0, undef, undef ],
        ],
    };
To activate and configure the LDAP back end:
- Copy the
$Self->{CustomerUser}section fromKernel/Config/Defaults.pmintoKernel/Config.pm. - Remove the comments (
#characters) from the beginning of the lines.
If additional customer user attributes are stored in your LDAP directory, such as a manager name, a mobile phone number, or a department, this information can be displayed in OTOBO.
To display additional customer user attributes from LDAP directory:
Expand the
Maparray inKernel/Config.pmwith the entries for these attributes.[ 'UserMobilePhone', 'Mobile Phone', 'mobilephone', 1, 0, 'var', '', 1, undef, undef ],
Bemerkung
It is recommended to always use English words for names.
Siehe auch
Names can be translated into other languages with custom translation files. See the Custom Translation File chapter in the developer manual.
Multiple Customer User Back Ends
If you want to use more than one customer user data source, the CustomerUser configuration parameter should be expanded with a number, like CustomerUser1 and CustomerUser2.
The following configuration example shows usage of both a database and an LDAP customer user back end.
# Data source 1: customer user database back end and settings.
    $Self->{CustomerUser1} = {
        Name   => 'Database Backend',
        Module => 'Kernel::System::CustomerUser::DB',
        Params => {
            DSN => 'DBI:odbc:yourdsn',
            DSN => 'DBI:mysql:database=customerdb;host=customerdbhost',
            User => '',
            Password => '',
            Table => 'customer_user',
        },
        # Other setting here.
    };

# Data source 2: customer user LDAP back end and settings.
    $Self->{CustomerUser2} = {
        Name => 'LDAP Backend',
        Module => 'Kernel::System::CustomerUser::LDAP',
        Params => {
            Host => 'bay.csuhayward.edu',
            BaseDN => 'ou=seas,o=csuh',
            SSCOPE => 'sub',
            UserDN => '',
            UserPw => '',
            AlwaysFilter => '',
            Die => 0,
            Params => {
                port    => 389,
                timeout => 120,
                async   => 0,
                version => 3,
            },
        },
        # Other setting here.
    };
It is possible to integrate up to 10 different customer back ends. Use the Kundenbenutzer screen to view or edit (assuming write access is enabled) all customer user data.
Customer User Data in Dynamic Fields
Sometimes it can be useful to also store customer user data directly in dynamic fields of a ticket, for example to create special statistics on this data.
The dynamic field values are set, when a ticket is created or when the customer user of a ticket is changed. The values of the dynamic fields are taken from the customer user data. This works for all back ends, but is especially useful for LDAP back ends.
To activate this optional feature:
Activate the setting
Ticket::EventModulePost###4100-DynamicFieldFromCustomerUser.Activate the setting
DynamicFieldFromCustomerUser::Mapping. This setting contains the configuration of which customer user field entry should be stored in which ticket dynamic field.Create the dynamic fields, if the dynamic fields are not present in the system yet.
Enable the dynamic fields in setting
Ticket::Frontend::AgentTicketFreeText###DynamicField, so that they can be set manually.Bemerkung
The dynamic field must not be enabled in the following settings:
Ticket::Frontend::AgentTicketPhone###DynamicFieldTicket::Frontend::AgentTicketEmail###DynamicFieldTicket::Frontend::AgentTicketCustomer###DynamicField
If they were, they would have precedence over the automatically set values.