Dynamic Fields
Beside general information required for all tickets, organizations have individual needs to add specific details to tickets. This needed information takes various formats like texts, integers, date-time and more.
OTOBO supports adding a so-called dynamic field to handle texts, integers, drop-down lists, multi-select fields, date-time, checkboxes and more. OTOBO administrators can define where those fields should be visible or editable, and of course, the dynamic fields are also available in statistics and reports.
Use this screen to manage dynamic fields in the system. A fresh OTOBO installation contains two dynamic fields by default. The dynamic field management screen is available in the Dynamic Fields module of the Processes & Automation group.
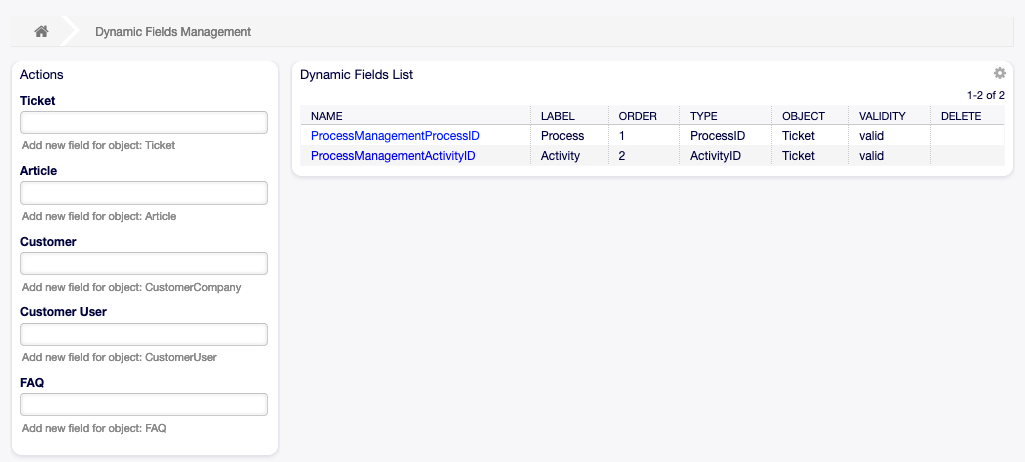
Dynamic Field Management Screen
Manage Dynamic Fields
To create a new dynamic field:
- Choose an object type in the left actions sidebar and select a dynamic field type from its drop-down.
- Fill in the required fields.
- Click on the Save button.
Create New Dynamic Field Screen
To edit a dynamic field:
- Click on a dynamic field in the dynamic fields list.
- Modify the fields.
- Click on the Save or Save and finish button.
Edit Dynamic Field Screen
To delete a dynamic field:
- Click on the trash icon in the last column of the overview table.
- Click on the Confirm button.

Delete Dynamic Field Screen
Note
If several dynamic fields are added to the system, use the filter box to find a particular dynamic field by just typing the name to filter.
Dynamic Field Settings
The following settings are available when adding or editing this resource. The fields marked with an asterisk are mandatory.
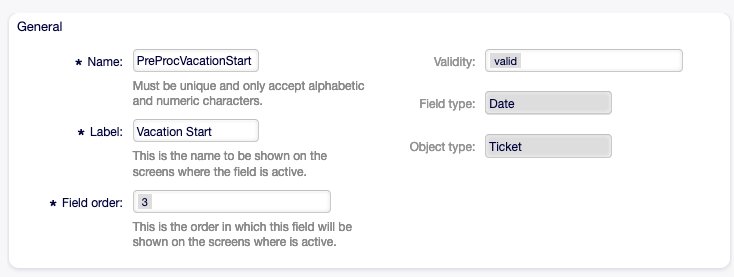
General Dynamic Field Settings
These settings are the same for all types of dynamic fields.
Dynamic Field General Screen
- Name *
- The name of this resource. The value should be alphabetic and numeric characters only. The name will be displayed in the overview table.
- Label *
This is the name to be shown on the screens where the field is active.
See also
It is possible to add translations for a dynamic field label. Label translations have to be added manually to language translation files.
- Field order *
- This is the order in which this field will be shown on the screens where is active.
- Validity *
- Set the validity of this resource. Each resource can be used in OTOBO only, if this field is set to valid. Setting this field to invalid or invalid-temporarily will disable the use of the resource.
- Field type
- This type has been selected in the left sidebar and can not be changed here anymore. This is a read-only field.
- Object type
This type has been selected in the left sidebar and can not be changed here anymore. This is a read-only field.
Note
The object type determines where the dynamic field can be used. For example a dynamic field with object type Ticket can be used only in tickets, and can not be used in articles.
The following settings are relevant only for the particular type of dynamic fields.
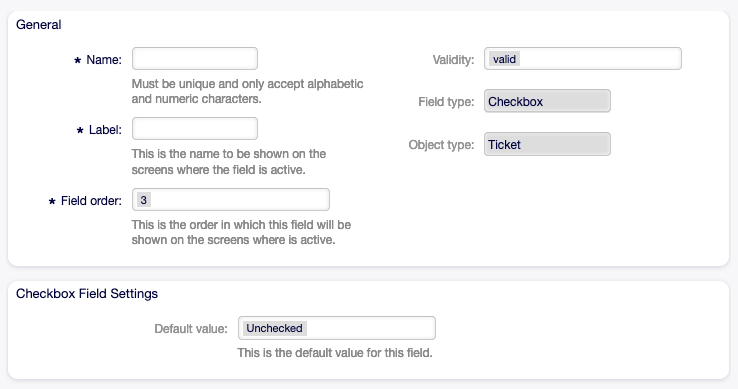
Checkbox Dynamic Field Settings
Checkbox dynamic field is used to store true or false value.

Checkbox Dynamic Field Settings
- Default value *
The default value for the checkbox.
- Checked
- The checkbox is checked by default.
- Unchecked
- The checkbox is unchecked by default.
Contact With Data Dynamic Field Settings
This dynamic field allows to add contacts with data to tickets.

Contact With Data Dynamic Field Settings
- Name Field *
- The attribute
Nameis always mandatory and it is not automatically added, so for each new data source this attribute must be added manually. Within the data source definition (or dynamic field configuration) this must be represented by the keyNameand the value could be Name for example. - ValidID Field *
- The attribute
ValidIDis always mandatory and it is not automatically added, so for each new data source this attribute must be added manually. Within the data source definition (or dynamic field configuration) this must be represented by the keyValidIDand the value could be Validity for example. - Other Fields
These are the possible data attributes for contacts. Clicking on the ⊞ button of the Add Fields will add two new fields, where a Key (internal value) and a Value (displayed value) can be set. With the button you can add multiple key-value pairs.
Warning
The keys
NameandValidIDare already used by Name Field and ValidID Field. Do not use these keys again!- Add Fields
- Use this button to add more fields to dynamic field.
- Mandatory fields
Comma separated list of mandatory keys.
Note
Keys
NameandValidIDare always mandatory and doesn’t have to be listed here.- Sorted fields
- Comma separated list of keys in sort order. Keys listed here come first, all remaining fields afterwards and sorted alphabetically.
- Searchable fields
Comma separated list of searchable keys.
Note
Key
Nameis always searchable and doesn’t have to be listed here.- Translatable values
If you activate this option the values will be translated to the user defined language.
Note
You need to add the translations manually into the language translation files.
When the dynamic field was saved, click on the name of the newly created dynamic field in the overview table. The Edit Dynamic Field screen will open. There is a button Add or edit contacts, that points to Tickets → Edit contacts with data to add some data.

Contact With Data Management Screen
To add a new contact with data:
- Select a dynamic field from the drop-down list in Actions widget of the left sidebar.
- Click on the Add contact with data button in the left sidebar.
- Fill in the required fields.
- Click on the Save button.
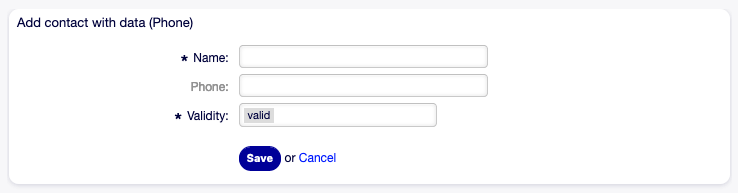
Add Contact With Data Screen
To edit a contact with data:
- Click on a contact with data in the list of contact with data entries.
- Modify the fields.
- Click on the Save or Save and finish button.
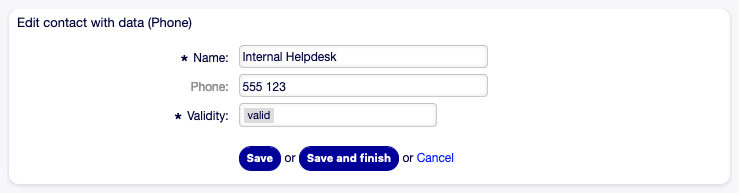
Edit Contact With Data Screen
The usage of this type of dynamic field is more complex then the others. An exemplary usage of contacts with data is as follows:
- Create a new dynamic field of type contact with data.
- Set the possible contact attributes (possible values).
- Type Name into Name Field.
- Type Validity into ValidID Field.
- Add any other attribute with Add Fields button such as
Telephoneattribute (key:Telephone, value: Phone).
- Add the list of mandatory attribute keys comma separated (
NameandValidIDare not needed). - Set the attribute key order list comma separated as:
Name,Telephone,ValidID. - Add the list of searchable attribute keys comma separated (
Nameis not needed). - Populate the data source by adding at least one contact in the newly created data source by using Tickets → Edit contacts with data screen from the main navigation bar.
- Add the new dynamic field to the screen’s configuration where it should be shown. For example in New Phone Ticket screen by updating the system configuration setting
Ticket::Frontend::AgentTicketPhone###DynamicFieldand do the same forTicket::Frontend::AgentTicketZoom###DynamicField. - Go to New Phone Ticket screen, and notice that the new field is there. Add all needed information to the ticket.
- Select an existing contact using autocomplete and choosing a contact.
- The assigned contact and its attributes will be shown in the Ticket Zoom screen.
- It is possible to update the attributes of the contact by clicking the Edit contact data button that appears in the right side of the title of the contact data box (if the current user is a member of the groups defined in system configuration setting
Frontend::Module###AdminDynamicFieldContactWithData). - If it’s necessary to change the contact for this ticket, it can be done via any other ticket action where the dynamic field is configured for display.
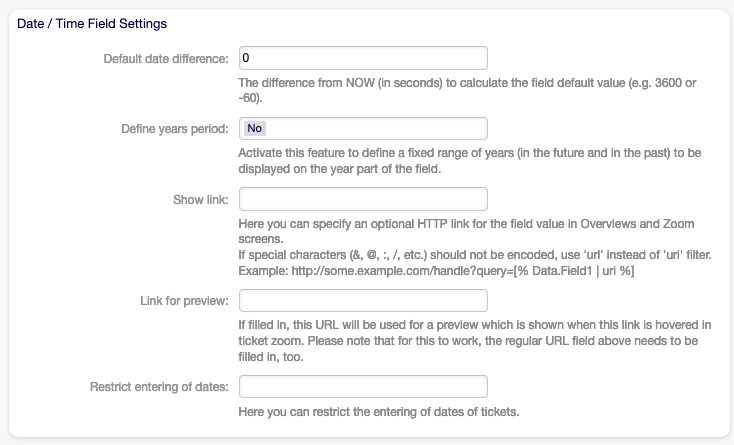
Date Dynamic Field Settings
Date dynamic field is used to store a date value.

Date Dynamic Field Settings
- Default date difference
- The difference from now (in seconds) to calculate the field default value (e.g. 3600 or -60).
- Define years period
Activate this feature to define a fixed range of years (in the future and in the past) to be displayed on the year part of the field. If set to Yes the following options will be available:
- Years in the past
- Define the number of years in the past from the current day to display in the year selection for this dynamic field in edit screens.
- Years in the future
- Define the number of years in the future from the current day to display in the year selection for this dynamic field in edit screens.
- Show link
Here you can specify an optional HTTP link for the field value in overviews and zoom screens. Example:
http://some.example.com/handle?query=[% Data.Field1 | uri %]
- Link for preview
- If filled in, this URL will be used for a preview which is shown when this link is hovered in ticket zoom. Please note that for this to work, the regular URL field above needs to be filled in, too.
- Restrict entering of dates
Here you can restrict the entering of dates of tickets.
- Prevent entry of dates in the future
- Selecting this option will prevent entering a date that is after the current date.
- Prevent entry of dates in the past
- Selecting this option will prevent entering a date that is before the current date.
Date / Time Dynamic Field Settings
Date / time dynamic field is used to store a date time value.
Date / Time Dynamic Field Settings
The settings for this type of dynamic field is the same as for date dynamic field.
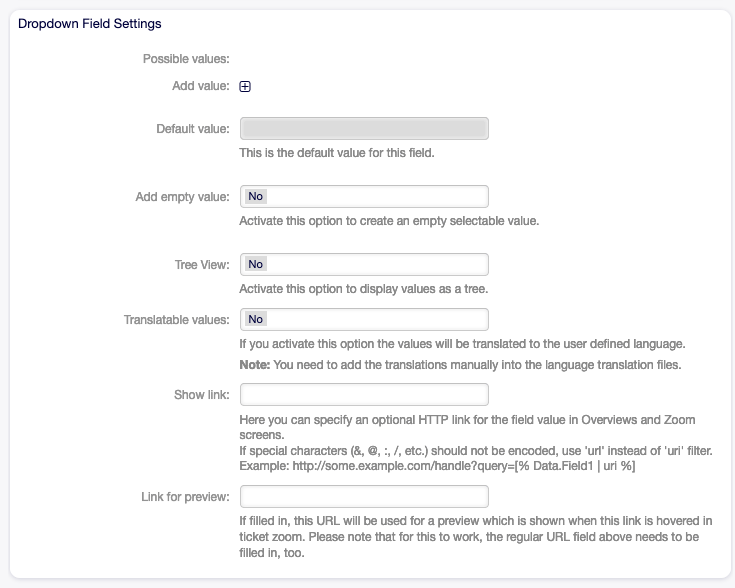
Dropdown Dynamic Field Settings
Drop-down dynamic field is used to store a single value, from a closed list.
Dropdown Dynamic Field Settings
- Possible values
- These are the possible data attributes for contacts. Clicking on the ⊞ button will add two new fields, where a key (internal value) and a value (displayed value) can be set. With the button you can add multiple key-value pairs.
- Default value
- This is the default value for this field and this will be shown on the edit screens.
- Add empty value
- If this option is activated an extra value is defined to show as a - in the list of possible values. This special value is empty internally.
- Tree View
- Activate this option to display values as a tree.
- Translatable values
If you activate this option the values will be translated to the user defined language.
Note
You need to add the translations manually into the language translation files.
- Show link
Here you can specify an optional HTTP link for the field value in overviews and zoom screens. Example:
http://some.example.com/handle?query=[% Data.Field1 | uri %]
- Link for preview
- If filled in, this URL will be used for a preview which is shown when this link is hovered in ticket zoom. Please note that for this to work, the regular URL field above needs to be filled in, too.
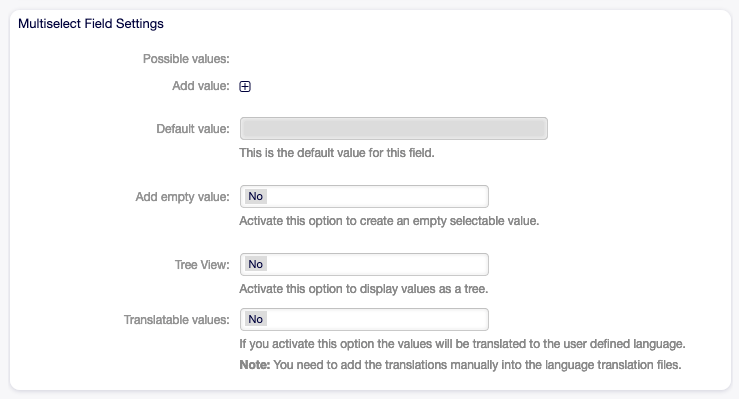
Multiselect Dynamic Field Settings
Multiselect Dynamic Field Settings
- Possible values
- These are the possible data attributes for contacts. Clicking on the ⊞ button will add two new fields, where a key (internal value) and a value (displayed value) can be set. With the button you can add multiple key-value pairs.
- Default value
- This is the default value for this field and this will be shown on the edit screens.
- Add empty value
- If this option is activated an extra value is defined to show as a - in the list of possible values. This special value is empty internally.
- Tree View
- Activate this option to display values as a tree.
- Translatable values
If you activate this option the values will be translated to the user defined language.
Note
You need to add the translations manually into the language translation files.
Text Dynamic Field Settings
Text dynamic field is used to store a single line string.
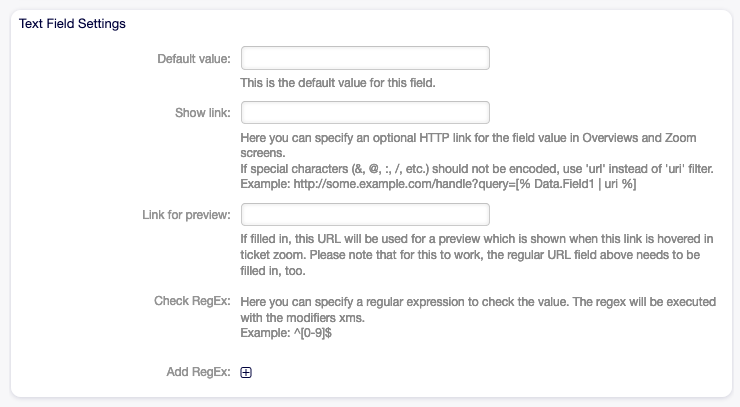
Text Dynamic Field Settings
- Default value
- This is the default value for this field and this will be shown on the edit screens.
- Show link
Here you can specify an optional HTTP link for the field value in overviews and zoom screens. Example:
http://some.example.com/handle?query=[% Data.Field1 | uri %]
- Link for preview
- If filled in, this URL will be used for a preview which is shown when this link is hovered in ticket zoom. Please note that for this to work, the regular URL field above needs to be filled in, too.
- Check RegEx
Here you can specify a regular expression to check the value. The regex will be executed with the modifiers
xms. Example:^[0-9]$
- Add RegEx
- Clicking on the ⊞ button will add two new fields, where a regular expression and an error message can be added.
Textarea Dynamic Field Settings
Textarea dynamic field is used to store a multiple line string.
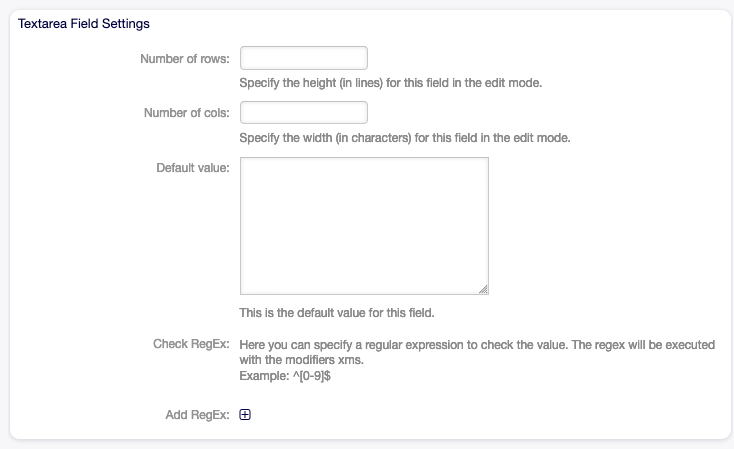
Textarea Dynamic Field Settings
- Number of rows
- The height (in lines) for this field in the edit mode.
- Number of cols
- The width (in characters) for this field in the edit mode.
- Default value
- This is the default value for this field and this will be shown on the edit screens.
- Check RegEx
Here you can specify a regular expression to check the value. The regex will be executed with the modifiers
xms. Example:^[0-9]$
- Add RegEx
- Clicking on the ⊞ button will add two new fields, where a regular expression and an error message can be added.
Database Dynamic Field
Note
This dynamic field is already included in OTOBO 10 Standard! The documentation on the field types still needs to be completed.
Web Service Dynamic Field
Note
This dynamic field is already included in OTOBO 10 Standard! The documentation on the field types still needs to be completed.
Display Dynamic Fields on Screens
To display a dynamic field on a screen:
- Make sure that the dynamic field Validity is set to valid.
- Open the System Configuration module in the admin interface.
- Navigate to Frontend → Agent → View and select a view to add the dynamic field to.
- Find the setting ends with
###DynamicFieldand click on the Edit this setting button. - Click on the + button to add the dynamic field.
- Enter the name of the dynamic field to the text box and click on the tick button.
- Select 1 - Enabled or 2 - Enabled and required.
- Click on the tick button on the right to save the setting.
- Deploy the modified system configuration.

Display Dynamic Fields on Screen
Note
It is possible to add multiple dynamic fields at the same time. To do this, repeat steps 5-7.
Set Default Value via Ticket Event Module
A ticket event (e.g. TicketCreate) can trigger a value set for a certain field, if the field does not have a value yet.
- Open the System Configuration module in the admin interface.
- Navigate to Core → Event → Ticket and search for the setting
Ticket::EventModulePost###9600-TicketDynamicFieldDefault. - Click on the Edit this setting button to activate the setting.
- Click on the tick button on the right to save the setting.
- Deploy the modified system configuration.
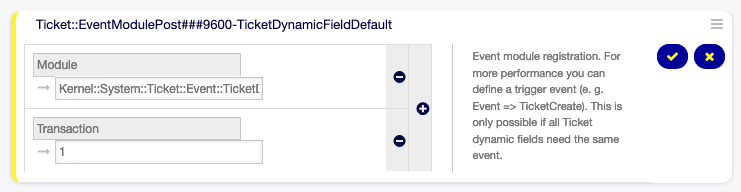
Activate Ticket Event Module
Example: activate Field1 in TicketCreate event:
- Open the System Configuration module in the admin interface.
- Navigate to Core → Ticket → DynamicFieldDefault and search for the setting
Ticket::TicketDynamicFieldDefault###Element1. - Click on the Edit this setting button to activate the setting.
- Click on the tick button on the right to save the setting.
- Deploy the modified system configuration.
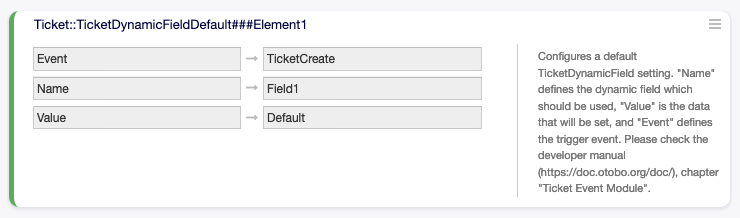
Activate Dynamic Field in Ticket Create Event
Note
This configuration can be set in any of the 16 Ticket::TicketDynamicFieldDefault###Element settings.
See also
If more than 16 fields needs to be set up, a custom XML file must be placed in $OTOBO_HOME/Kernel/Config/Files/XML directory to extend this feature.
Set Default Value via User Preferences
The dynamic field default value can be overwritten with a user defined value stored in the personal preferences.
- Open the System Configuration module in the admin interface.
- Navigate to Frontend → Agent → View → Preferences and search for the setting
PreferencesGroups###DynamicField. - Click on the Edit this setting button to activate the setting.
- Click on the tick button on the right to save the setting.
- Deploy the modified system configuration.
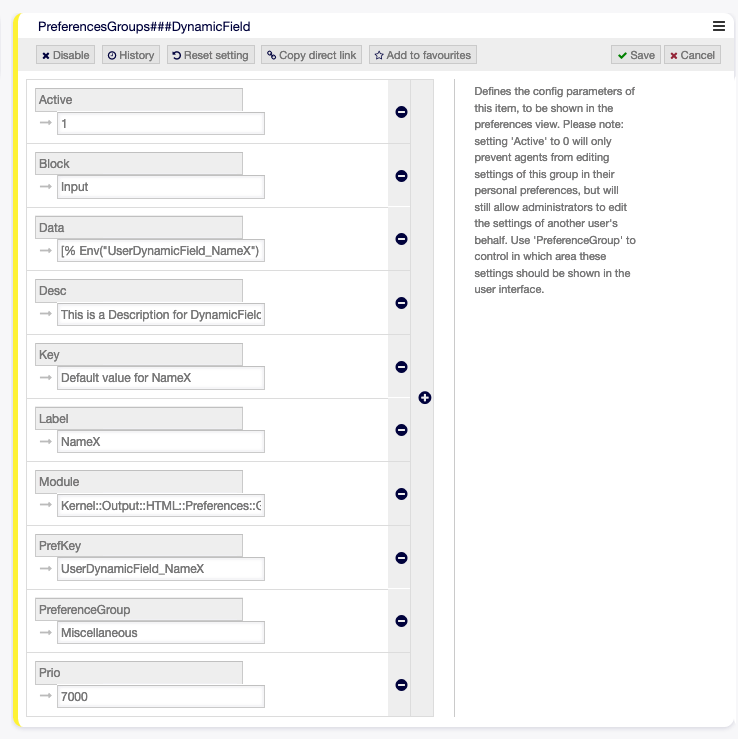
Activate Dynamic Field in Personal Preferences
Click on your avatar on the top left corner, and select Personal Preferences → Miscellaneous to add a default value for the dynamic field.

Dynamic Field in Personal Preferences
This setting is an example of how to create an entry in the user preferences screen to set an exclusive dynamic field Name_X default value for the selected user. The limitation of this setting is that it only permits the use of one dynamic field. If two or more fields will use this feature, it is necessary to create a custom XML configuration file to add more settings similar to this one.
Note
If more settings are added in a new XML each setting name needs to be unique in the system and different than PreferencesGroups###DynamicField. For example:
PreferencesGroups###101-DynamicField-Field1PreferencesGroups###102-DynamicField-Field2PreferencesGroups###My-Field1PreferencesGroups###My-Field2