Process Management
Maximizing performance while minimizing human error is a requirement of organizations of all sizes. This need is covered by defined processes and workflows, for recurring tasks. Ensuring all required information is available in the right place, and contacts are informed about their responsibilities like adding information, approving requests, etc.
OTOBO supports this requirement by process management. Process tickets help by using the required mandatory and optional fields (see Dynamic Fields) that information is not forgotten upon ticket creation or during later steps of the process. Process tickets are simple to handle for customer users and agents, so no intensive training is required.
Processes are designed completely and efficiently within the OTOBO front end to fit the requirements of your organization.
Use this screen to manage processes in the system. The process management screen is available in the Process Management module of the Processes & Automation group.
Manage Processes
To create a new process:
- Click on the Create New Process button in the left sidebar.
- Fill in the required fields.
- Click on the Save button.
- Add activities, activity dialogs, transitions and transition actions.
- Set State to Active.
- Deploy all processes.
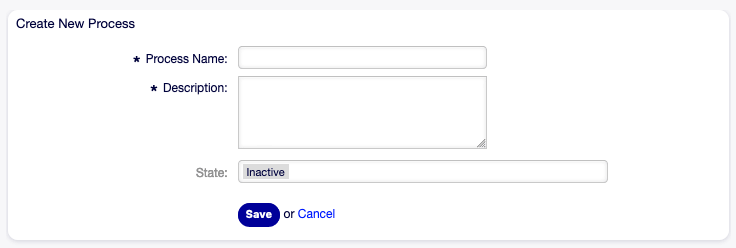
Create New Process Screen
To edit a process:
- Click on a process in the list of processes.
- Modify the fields and the process path.
- Click on the Save or Save and finish button.
- Deploy all processes.
To copy a process:
- Click on the copy icon in the fifth column of list of processes.
- Click on the newly created process to edit it.
To delete a process:
- Click on a process in the list of processes.
- Set the State option to Inactive.
- Click on the Save button. A new Delete Inactive Process button will appear in the left sidebar.
- Click on the Delete Inactive Process button.
- Click on the Delete button in the confirmation screen.
- Deploy all processes.
Warning
Processes are written into file in Perl format. Without deploying, all processes are still in this cache file even if they are deleted or the State option is set to Inactive or FadeAway. Don’t forget to deploy all processes after modifications!
Give some time for agents to complete the running process tickets before the process will be deleted. It is possible to mark a process for deletion, i. e. set the process as not to be selected anymore. Process states can be:
- Active
- Processes can be used in new process tickets.
- FadeAway
- Processes cannot be selected any more for new tickets, but existing tickets still can use the process.
- Inactive
- Processes are deactivated and cannot be used for new or existing tickets.
To deploy all processes:
- Click on the Deploy All Processes button in the left sidebar.
Note
New or modified processes have to deploy in order to make affect the behavior of the system. Setting the State option to Active just indicates, which processes should be deployed.
To export a process:
- Click on the export icon in the fourth column of list of processes.
- Choose a location in your computer to save the
Export_ProcessEntityID_xxx.ymlfile.
Warning
The exported file contains only the process itself, and doesn’t contain the Queues, Agents, Dynamic Fields, etc. needed for the process.
To import a process:
- Click on the Browse… button of the Configuration Import widget in the left sidebar.
- Select a previously exported
.ymlfile. - Click on the Import process configuration button.
- Deploy all processes.
Note
Before import of a process, it is still necessary to create all Queues, Agents and Dynamic Fields, as well as to set System Configuration, that are needed by each process before the import. If the process requires the use of Access Control Lists (ACL) those are also needed to be set manually.
Note
If several processes are added to the system, use the filter box to find a particular process by just typing the name to filter.
Process Elements
The element names of the process modeler have been adapted to the Business Process Model and Notation (BPMN) ISO naming convention. The following task activities can be used as basic elements of the process.
- Script task activity
Script task activity is executed by the process management module and it can set dynamic field values or manage tickets automatically.
Script Task Activity Window
The following settings are available when adding or editing this resource. The fields marked with an asterisk are mandatory.
- Activity name *
- The name of this resource. Any type of characters can be entered to this field including uppercase letters and spaces.
- Activity type *
The following types of task activities can be used:
- Script task activity (selected for now)
- Service task activity
- User task activity
- Activity description
- Add additional information to this resource. It is recommended to always fill this field as a description of the resource with a full sentence for better clarity.
- Activity error code
- Define a custom error code for script or service task activities. The custom error code must be a positive integer number.
- Can start processes in
Defines, where can the processes be started by the agents or customer users. A process can be started in the following interfaces:
- Agent Interface
- Agent and External Interface
- External Interface
- Script *
- In this drop-down can be selected which script should be triggered immediately if the activity is set. Click on the Configure button to add parameters (key-value pairs) for the script.
- Service task activity
Service task activity uses a web service to complete the task.
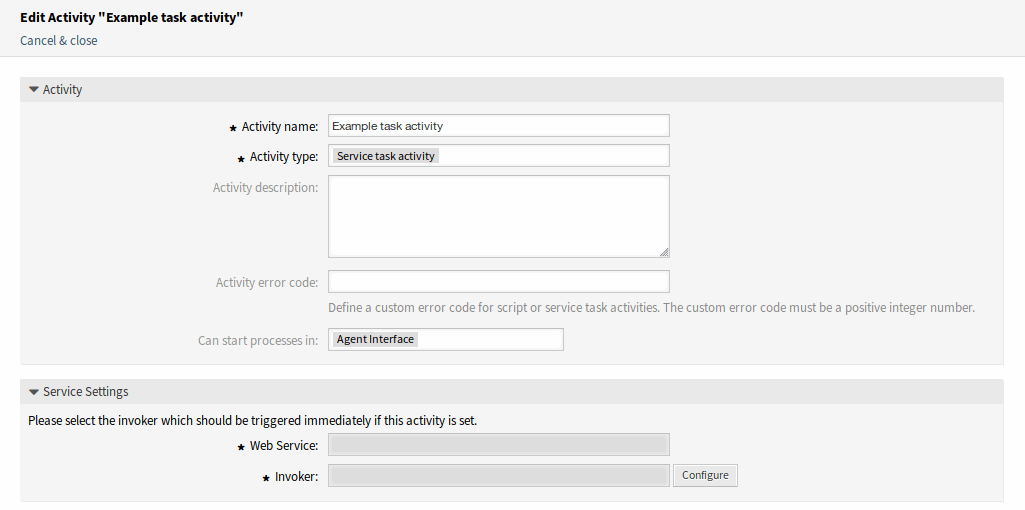
Service Task Activity Window
The following settings are available when adding or editing this resource. The fields marked with an asterisk are mandatory.
- Activity name *
- The name of this resource. Any type of characters can be entered to this field including uppercase letters and spaces.
- Activity type *
The following types of task activities can be used:
- Script task activity
- Service task activity (selected for now)
- User task activity
- Activity description
- Add additional information to this resource. It is recommended to always fill this field as a description of the resource with a full sentence for better clarity.
- Activity error code
- Define a custom error code for script or service task activities. The custom error code must be a positive integer number.
- Can start processes in
Defines, where can the processes be started by the agents or customer users. A process can be started in the following interfaces:
- Agent Interface
- Agent and External Interface
- External Interface
- Web Service *
- Select one of the Web Services from the drop-down list.
- Invoker *
- Select an invoker for the web service. Click on the Configure button to add parameters for the invoker.
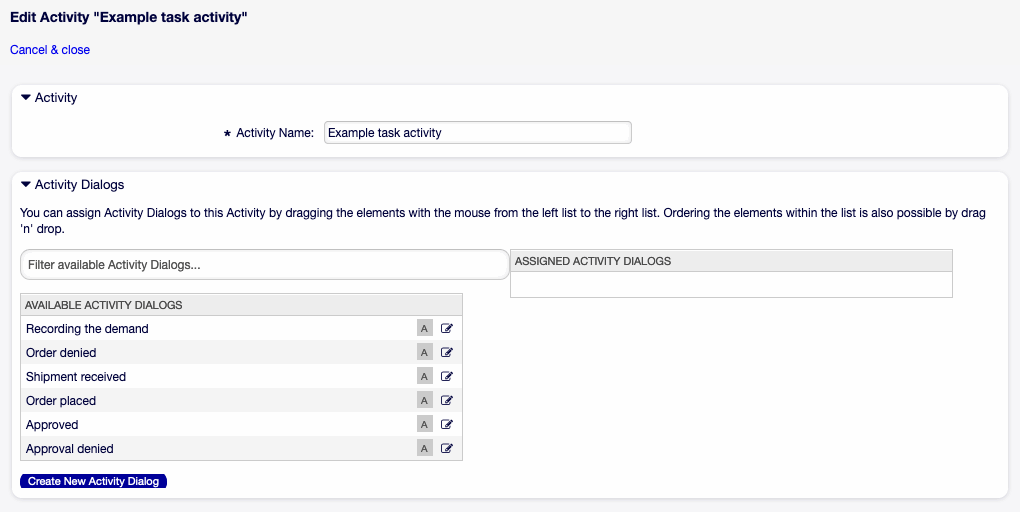
- User task activity
User task activity can be used when the task is being done by an agent or a customer user.
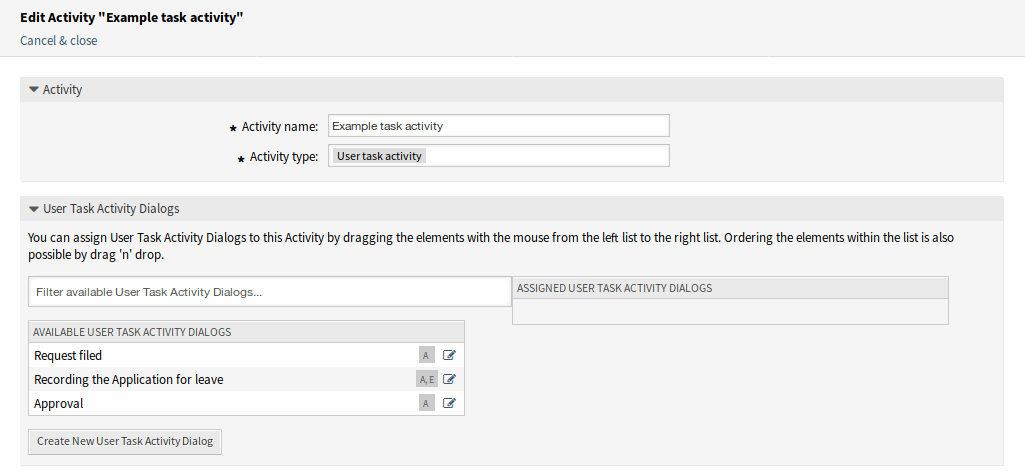
User Task Activity Window
The following settings are available when adding or editing this resource. The fields marked with an asterisk are mandatory.
- Activity name *
- The name of this resource. Any type of characters can be entered to this field including uppercase letters and spaces.
- Activity type *
The following types of task activities can be used:
- Script task activity
- Service task activity
- User task activity (selected for now)
- Activity Dialogs
You can assign activity dialogs to this activity by dragging the elements with the mouse from the left list to the right list. Ordering the elements within the list is also possible by drag and drop.
Click on the Create New Activity Dialog button to create new dialogs.
Example process
Processes are more complex than other resources in OTOBO. To create a process, you need to do several steps. The following chapters show you, how to define a process from the specification and create the needed resources. Let’s see an example to make it more demonstrative. We will define a book order process.
Process Specification
The book order process has four states.
- Recording the demand
Before an order will be placed, the demand for literature by an employee will be recorded. The following book is needed in our example:
Title: Prozessmanagement für Dummies
Autor: Thilo Knuppertz
ISBN: 35210.03713
- Approval by manager
- The head of the employee’s department needs to decide on the order. In case of a denial, a reason should be recorded by the manager. In case of approval, the order is passed to the purchasing department.
- Processing by purchasing department
- Purchasing now has the task to find out where the book can be ordered with the best conditions. If it is out of stock, this can be recorded in the order. In case of a successful order purchasing will record the supplier, the price and the delivery date.
- Processing by the mail room
- The shipment will arrive at the company. The incoming goods department checks the shipment and records the date of receipt. Now the employee will be informed that their order has arrived and is ready to be collected.
Introduce The Process Elements
If we assume that a ticket acts in this workflow like an accompanying document that can receive change notes, we already have a clear picture of process tickets.
From the analysis of the example process we can identify the following necessary items:
- Possibility to record data, let’s call this activity dialog.
- Check which can react to changed data automatically, let’s call this transition.
- Change which can be applied to a process ticket after successful transitions of a process ticket, let’s call this transition action.
- A possibility to offer more than just one activity dialog to be available. In our example this is needed when the manager must have the choice between Approve and Deny. Let’s call this activity.
Now, with activities, activity dialogs, transitions and transition actions we have the necessary tools to model the individual steps of our example. What is still missing is an area where for each workflow the order of the steps can be specified. Let’s call this process.
Create Necessary Resources
Before the creation of the process and its parts is necessary to prepare the system. We need to define some Queues, Agents and Dynamic Fields as well as set some System Configuration settings.
Create the following Queues:
- Management
- Employees
- Purchasing
- Post office
Create the following Agents:
- Manager
- Employee
Create the following Dynamic Fields:
| Object | Type | Name | Label | Possible values |
|---|---|---|---|---|
| Ticket | Text | Title |
Title | |
| Ticket | Text | Author |
Author | |
| Ticket | Text | ISBN |
ISBN | |
| Ticket | Dropdown | Status |
Status |
|
| Ticket | Text | Supplier |
Supplier | |
| Ticket | Text | Price |
Price | |
| Ticket | Date | DeliveryDate |
Delivery date | |
| Ticket | Date | DateOfReceipt |
Date of receipt |
Set the following System Configuration settings:
Ticket::Responsible- Enabled
Ticket::Frontend::AgentTicketZoom###ProcessWidgetDynamicFieldGroupsBook→Title,Author,ISBNGeneral→StatusOrder→Price,Supplier,DeliveryDateShipment→DateOfReceipt
Ticket::Frontend::AgentTicketZoom###ProcessWidgetDynamicFieldAuthor→ 1 - EnabledDateOfReceipt→ 1 - EnabledDeliveryDate→ 1 - EnabledISBN→ 1 - EnabledPrice→ 1 - EnabledStatus→ 1 - EnabledSupplier→ 1 - EnabledTitle→ 1 - Enabled
Note
Don’t forget to deploy the modified system configuration settings.
Now, go back to the Process Management screen and click on the Create New Process. Fill in the required fields.
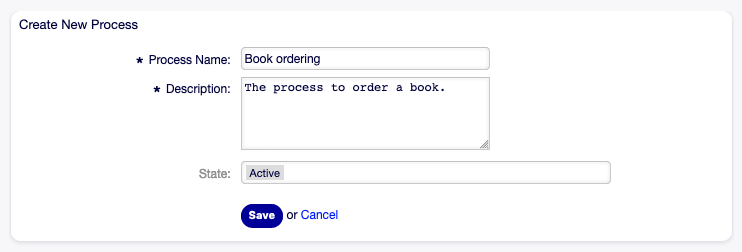
Book Ordering - Create New Process
The new process is created. You can add some process element now.
Create Activity Dialogs
Click on the Activity Dialogs item in the Available Process Elements widget in the left sidebar. This action will expand the Activity Dialogs options and will collapse all others doing an accordion like effect. Click on the Create New Activity Dialog button.
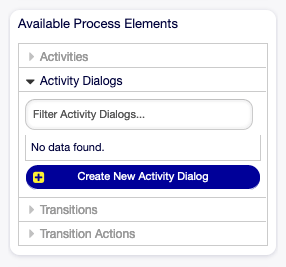
Book Ordering - Activity Dialogs
In the opened popup screen fill in the Dialog Name as well as the Description (short) fields. For this example we will leave all other fields as the default.
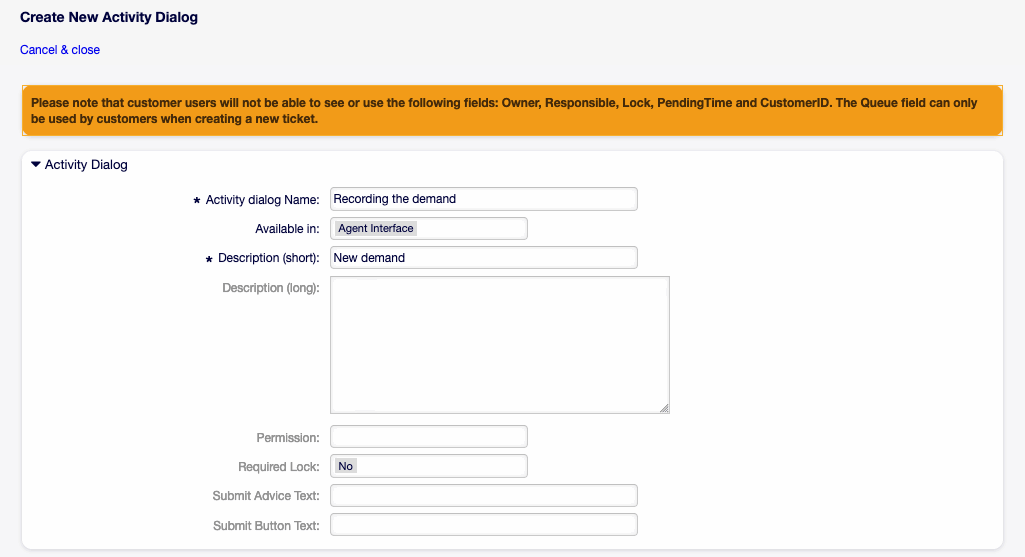
Book Ordering - Add Activity Dialog
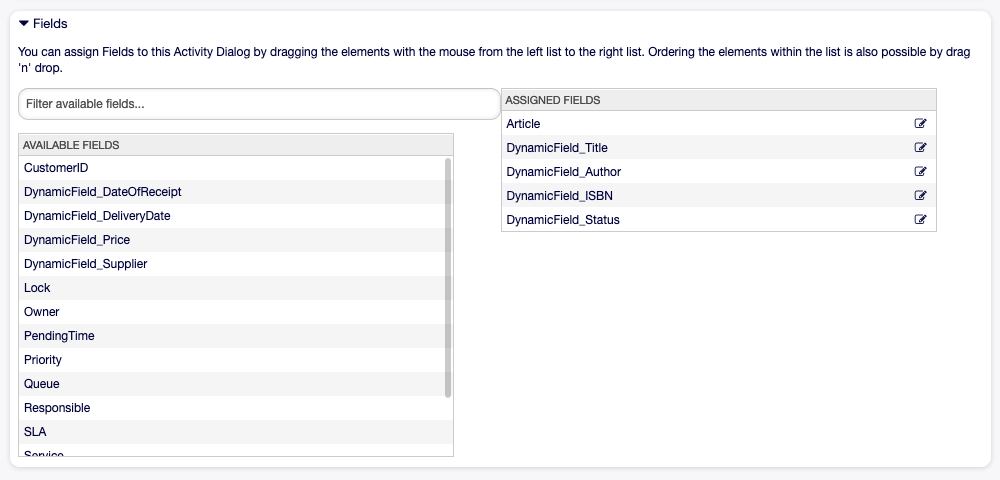
To assign fields to the activity dialog simple drag the required field from the Available Fields pool and drop into the Assigned Fields pool. The order in the Assigned Fields pool is the order as the fields will have in the screen. To modify the order simply drag and drop the field within the pool to rearrange it in the correct place.
In this example we will use:
Articlefield for comments.DynamicField_Title,DynamicField_Author,DynamicField_ISBNfields for the data to be collected for the order.DynamicField_Statuswith the possibility to choose Approval.
Drag these fields from the Available Fields pool and drop into the Assigned Fields pool.
Note
In this screen all dynamic fields has the prefix DynamicField_ as in DynamicField_Title. Do not confuse with the field Title that is the ticket title.
Book Ordering - Add Activity Dialog Fields
As soon as the fields are dropped into the Assigned Fields pool another popup screen is shown with some details about the field. We will leave the default options and only for Article fields we should make sure that the Communication Channel field is set to OTOBO and that the Is visible for customer is not checked.
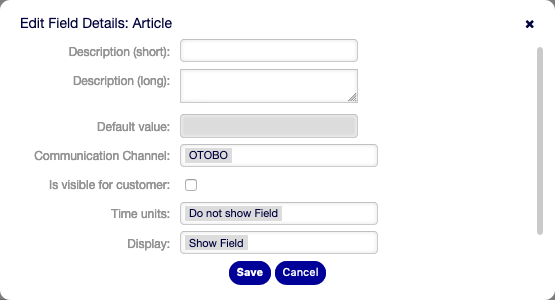
Book Ordering - Edit Activity Dialog Fields
After all fields are filled in, click on the Save and finish button to save the changes and go back to the process management screen.
Create the following activity dialogs with fields:
Recording the demand (already created before)
Articlefield for comments.DynamicField_Title,DynamicField_Author,DynamicField_ISBNfields for the data to be collected for the order.DynamicField_Statuswith the possibility to choose Approval.
Approval denied
Articlefield for comments.DynamicField_Statuswith the possibility to choose Approval denied.
Approved
DynamicField_Statuswith the possibility to choose Approved.
Order denied
Articlefield for comments.DynamicField_Statuswith the possibility to choose Order denied.
Order placed
DynamicField_Supplier,DynamicField_Price,DynamicField_DeliveryDatefields for purchasing.DynamicField_Statuswith the possibility to choose Order placed.
Shipment received
DynamicField_DateOfReceiptfor the mail room.DynamicField_Statuswith the possibility to choose Shipment received.
Create Transitions
Click on the Transitions item in the Available Process Elements widget in the left sidebar. This action will expand the Transitions options and will collapse all others doing an accordion like effect. Click on the Create New Transition button.
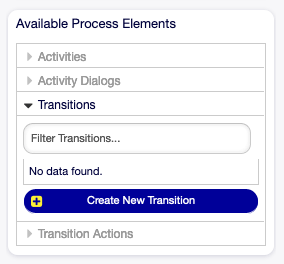
Book Ordering - Transitions
In the opened popup screen fill in the Transition Name. For this example in the Condition Expressions we will use just one condition expression and just one field. For both we can leave the Type of Linking as and and we will use the filed match type value as String.
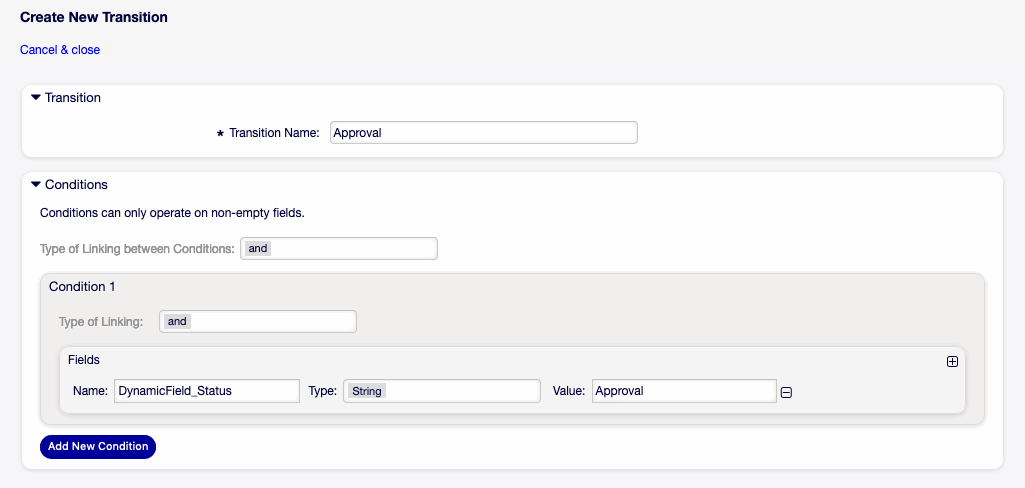
Book Ordering - Add Transition
After all fields are filled in, click on the Save and finish button to save the changes and go back to the process management screen.
Create the following transitions:
Approval (already created before)
Check if the
DynamicField_Statusis set to Approval.Approval denied
Check if the
DynamicField_Statusfield is set to Approval denied.Approved
Check if the
DynamicField_Statusfield is set to Approved.Order denied
Check if the
DynamicField_Statusfield is set to Order denied.Order placed
Check if the
DynamicField_Statusfield is set to Order placed.Shipment received
Check if the
DynamicField_Statusfield is set to Shipment received.
Create Transition Actions
Click on the Transition Actions item in the Available Process Elements widget in the left sidebar. This action will expand the Transition Actions options and will collapse all others doing an accordion like effect. Click on the Create New Transition Action button.
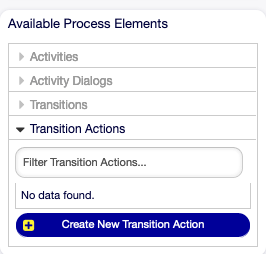
Book Ordering - Transition Actions
In the opened popup screen fill in the Transition Action Name and the Transition Action module then click on the Save button. A new Configure button will appear next to the module field.

Book Ordering - Add Transition Action
Click on the Configure button and add the needed configuration parameter keys and values.

Book Ordering - Transition Action Parameters
After all fields are filled in, click on the Save and finish button to save the changes and go back to the process management screen.
See also
Each module has its own and different parameters. Please review the module documentation to learn all require and optional parameters.
- DynamicFieldSet
- TicketArticleCreate
- TicketCreate
- TicketCustomerSet
- TicketLockSet
- TicketOwnerSet
- TicketQueueSet
- TicketResponsibleSet
- TicketSendEmail
- TicketServiceSet
- TicketSLASet
- TicketStateSet
- TicketTitleSet
- TicketTypeSet
All transition action modules are located in the legacy named Kernel/System/ProcessManagement/TransitionAction.
Create the following transition actions:
Move the process ticket into the “Management” queue (already created before)
To be executed when the transition Approval applied.
Change ticket responsible to “Manager”
To be executed when the transition Approval applied.
Move process ticket into the “Employees” queue
To be executed when:
- The transition Approval denied applied.
- The transition Order denied applied.
- The transition Shipment received applied.
Change ticket responsible to “Employee”
To be executed when:
- The transition Approval denied applied.
- The transition Order denied applied.
- The transition Shipment received applied.
Move process ticket into the “Purchasing” queue
To be executed when the transition Approved applied.
Move process ticket into the “Post office” queue
To be executed when the transition Order placed applied.
Close ticket successfully
To be executed when the transition Shipment received applied.
Close ticket unsuccessfully
To be executed when:
- The transition Approval denied applied.
- The transition Order denied applied.
There are places where the same transition actions should be executed. Therefore it is reasonable to make it possible to link transition actions freely with transitions to be able to reuse them.
Create Activities
Click on the Activities item in the Available Process Elements widget in the left sidebar. This action will expand the Activities options and will collapse all others doing an accordion like effect. Click on the Create New Activity button.
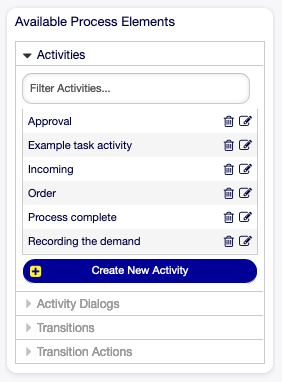
Book Ordering - Activities
In the opened popup screen fill in the Activity name field and select User task activity from the Activity type drop-down.

Book Ordering - Add Activity
To assign dialogs to the activity simple drag the required dialogs from the Available Activity Dialogs pool and drop into the Assigned Activity Dialogs pool. The order in the Assigned Activity Dialogs pool is the order as the dialogs will be presented in the Ticket Zoom screen. To modify the order simply drag and drop the dialog within the pool to rearrange it in the correct place.
Note
This order is specially important in the first activity, since the first activity dialog for this activity is the only one that is presented when the process starts.
In this example we need to assign only the Recording the demand activity dialog. Drag this dialog from the Available Activity Dialogs pool and drop into the Assigned Activity Dialogs pool.
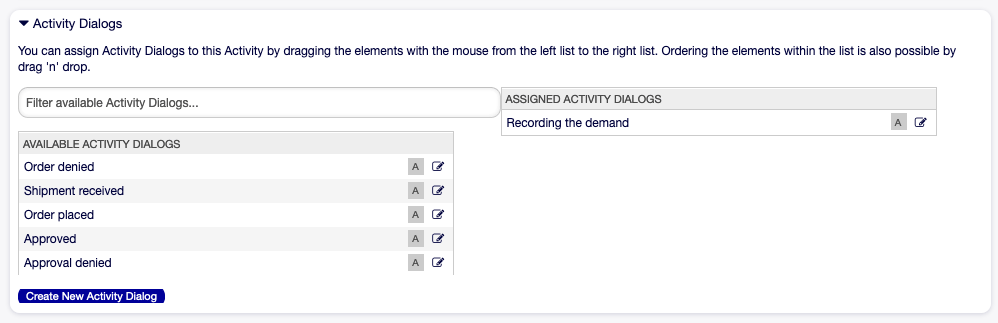
Book Ordering - Assign Activity Dialog
After all fields are filled in, click on the Save and finish button to save the changes and go back to the process management screen.
Create the following activities:
Recording the demand (already created before)
Assign the activity dialog Recording the demand.
Approval
Assign the activity dialogs Approval denied and Approved.
Order
Assign the activity dialogs Order denied and Order placed.
Incoming
Assign the activity dialog Shipment received.
Process complete
This is an activity without possible activity dialogs. It will be set after Approval denied, Order denied or Shipment received and represents the end of the process.
Now we can clearly see that activities are precisely defined states of a process ticket. After a successful transition a process ticket moves from one activity to another.
Create Process Path
Let us conclude our example with the last missing piece in the puzzle, the process as a flow describer. In our case this is the whole ordering workflow. Other processes could be office supply ordering or completely different processes.
The process has a starting point which consists of the start activity and the start activity dialog. For any new book order, the first activity dialog of the first activity is the first screen that is displayed. If this is completed and saved, the process ticket will be created and can follow the configured workflow.
The process also contains the directions for how the process ticket can move through the process. Let’s call this process path. It consists of the start activity, one or more transitions (possibly with transition actions) and other activities.
Assuming that the activities have already assigned their activity dialogs, drag an activity from the accordion in the Available Process Elements widget in the left sidebar and drop it into the canvas area below the process information. Notice that an arrow from the process start (white circle) to the activity is placed automatically. This is the first activity and its first activity dialog is the first screen that will be shown when the process starts.

Book Ordering - First Activity On Canvas
Next, drag another activity into the canvas too. Now we will have two activities in the canvas. The first one is connected to the start point and the second has no connections. You can hover the mouse over each activity to reveal their own activity dialogs.
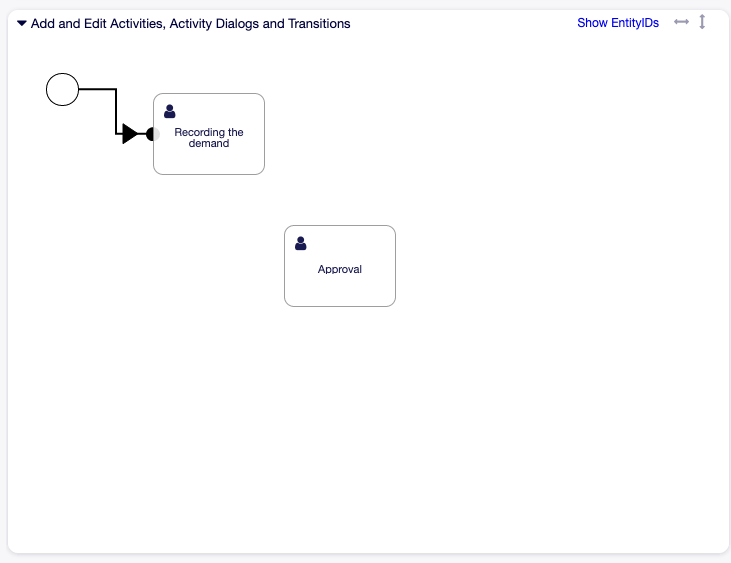
Book Ordering - Second Activity On Canvas
Then let’s create the process path (connection) between this two activities. For this we will use the transitions. Click on transition in the accordion, drag a transition and drop it inside the first activity. As soon as the transition is dropped the end point of the transition arrow will be placed next to the process start point. Drag the transition arrow end point and drop it inside the other activity to create the connection between the activities.
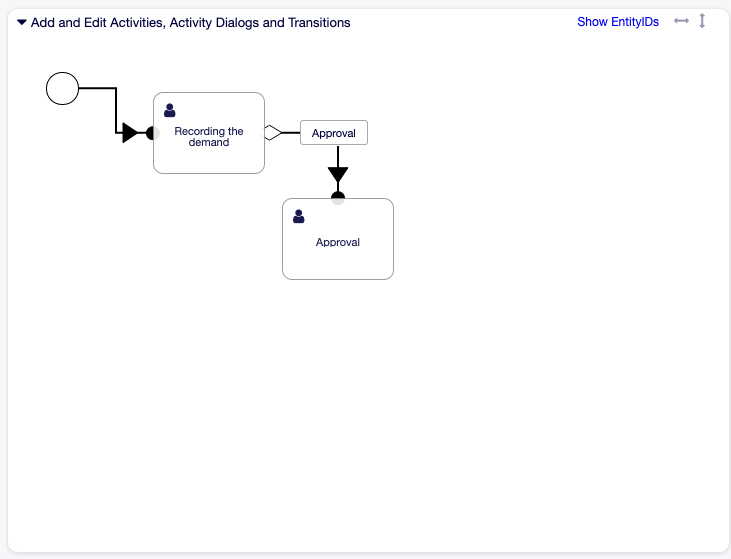
Book Ordering - First Transition On Canvas
Now that the process path between the actions is defined, then we need to assign the transition actions to the transition. Double click the transition label in the canvas to open a new popup window.
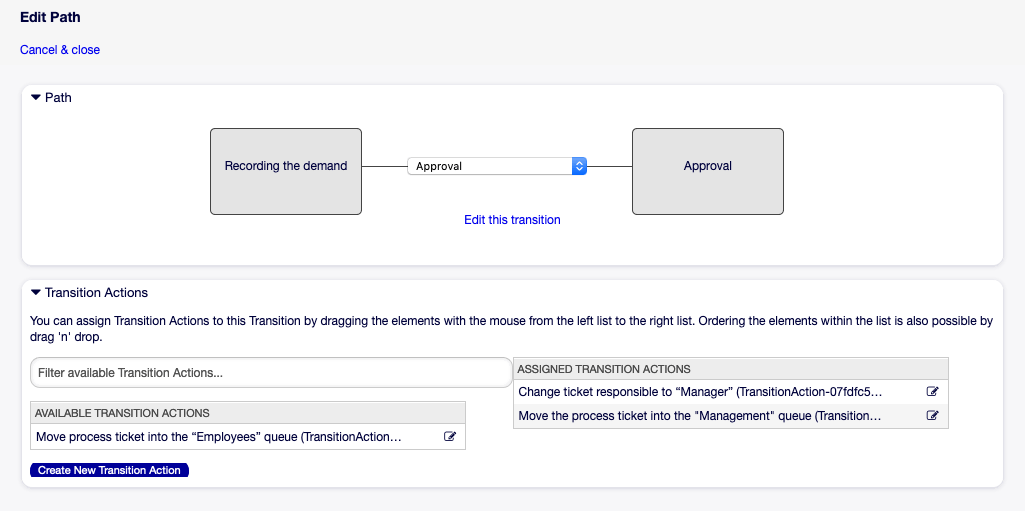
Book Ordering - Assign First Transition Action
After the transition actions are assigned, click on the Save button to go back to the main process edit screen. Click on Save button below the canvas to save all other changes.
Complete the process path by adding the following activities, transitions and transition actions:
Recording the demand (already created before)
Possible transition: Approval
Starting activity: Recording the demand
Next activity: Approval
If the condition of this activity is fulfilled, the ticket will move to activity Approval.
Additionally, the following transition actions are executed:
- Move the process ticket into the “Management” queue
- Change ticket responsible to “Manager”
The activity Recording the demand is a defined step of the process ticket, where there is the possibility for the transition Approval. If this applies, the ticket will move to the next activity Approval, and the transition actions Move the process ticket into the “Management” queue and Change ticket responsible to “Manager” are executed. In the activity Approval, the activity dialogs Approval denied and Approved are available.
Approval
Possible transition: Approval denied
Starting activity: Approval
Next activity: Process complete
If this matches, the process ticket will move to activity Process complete.
Additionally, the following transition actions are executed:
- Move process ticket into the “Employees” queue
- Change ticket responsible to “Employee”
- Close ticket unsuccessfully
Possible transition: Approved
Starting activity: Approval
Next activity: Order
If this matches, the process ticket will move to activity Order.
Additionally, the following transition actions are executed:
- Move process ticket into the “Purchasing” queue
We can see that from the current activity, which defines a step of the process ticket, there are one or more possibilities for transition which have exactly one target activity (and possibly one or more transition actions).
Order
Possible transition: Order denied
Starting activity: Order
Next activity: Process complete
If this matches, the process ticket will move to activity Process complete.
Additionally, the following transition actions are executed:
- Move process ticket into the “Employees” queue
- Change ticket responsible to “Employee”
- Close ticket unsuccessfully
Possible transition: Order placed
Starting activity: Order
Next activity: Incoming
If this matches, the process ticket will move to activity Incoming.
Additionally, the following transition actions are executed:
- Move process ticket into the “Post office” queue
Incoming
Possible transition: Shipment received
Starting activity: Incoming
Next activity: Process complete
If this matches, the process ticket will move to activity Process complete.
Additionally, the following transition actions are executed:
- Move process ticket into the “Employees” queue
- Change ticket responsible to “Employee”
- Close ticket successfully
The complete process path for the book ordering process will then look like this:
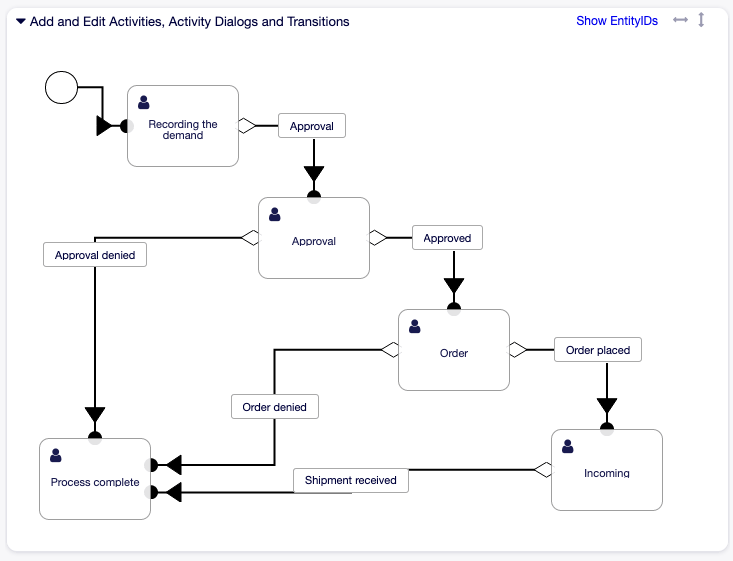
Book Ordering - Process Complete
After you finish the process path, click on Save and finish button below the canvas to go back to the process management screen.
Click on the Deploy All Processes button in the left sidebar. This will gather all processes information form the database and create a cache file (in Perl language). This cache file is actually the processes configuration that the system will use to create or use process tickets.
Note
Any change that is made on the process will require to re-deploy the process in order to get the change reflected in the system.