Email Addresses
The main channel of communication with the customers is often email. An organization consists of multiple departments or teams. Email addresses differ for each group which is servicing your customers. You may have the following:
support@example.orghr@exapmle.orgsales@example.orgThese addresses are just some examples, and you may have many more. Use these channels to receive and send messages, and in mail clients, one can often send with the wrong address.
OTOBO manages as many email addresses for your teams as needed. All your email addresses, whether for sending or receiving, are kept and configured nicely in one place. In the Queue Settings, the correct address is always chosen preventing that someone working in multiple roles sends an email out with the wrong account.
To enable OTOBO to send emails, you need a valid email address to be used by the system. OTOBO is capable of working with multiple email addresses, since many support installations need to use more than one. A queue can be linked to many email addresses, and vice versa. The address used for outgoing messages from a queue can be set when the queue is created.
Use this screen to add system email addresses to the system. An email address is already added to the system at installation time of OTOBO. The email address management screen is available in the Email Addresses module of the Communication & Notifications group.

Email Address Management Screen
Manage Email Addresses
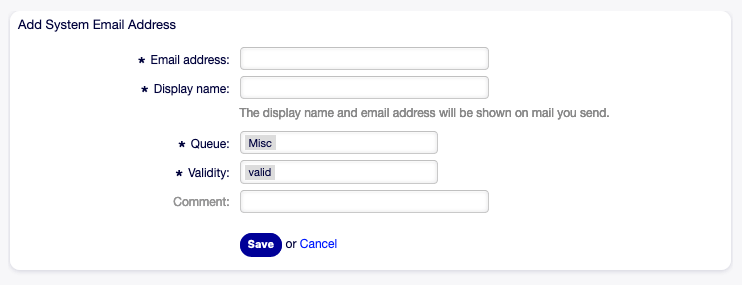
To add an email address:
- Click on the Add System Address button in the left sidebar.
- Fill in the required fields.
- Click on the Save button.

Email Address Add Screen
Warning
Email addresses can not be deleted from the system. They can only be deactivated by setting the Validity option to invalid or invalid-temporarily.
Note
Once an email address is added and set to valid, OTOBO cannot send an email to this address. This prevents loopbacks which could crash your system. If you need to transfer information between departments please use the ticket split option in the article menu. This will allow you to create a new ticket to another team for assigning a task, for example.

Article Menu
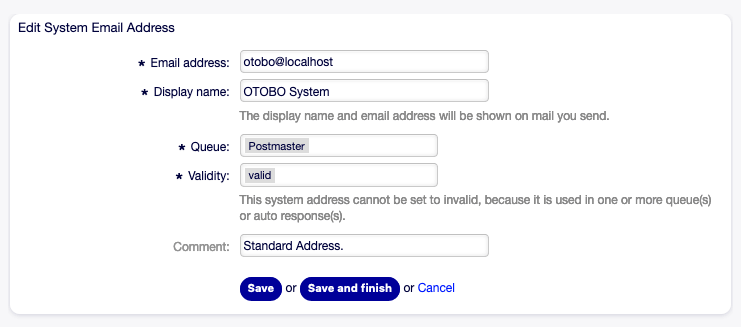
To edit an email address:
- Click on an email address in the list of email addresses.
- Modify the fields.
- Click on the Save or Save and finish button.

Email Address Edit Screen
Note
If several email addresses are added to the system, use the filter box to find a particular email address by just typing the name to filter.
Email Address Settings
The following settings are available when adding or editing this resource. The fields marked with an asterisk are mandatory.
- Email address *
- The email address to be added.
- Display name *
The name of this resource. Any type of characters can be entered to this field including uppercase letters and spaces. The name will be displayed in the sender information of the article.

Sender Information
- Queue *
The queue, to which the email address will be added as default email address.
Note
This setting will apply if the email is distributed via the recipient address. This setting can be overridden by Postmaster Filters or in the Mail Account Settings when Dispatching by selected Queue is chosen.
- Validity *
Set the validity of this resource. Each resource can be used in OTOBO only, if this field is set to valid. Setting this field to invalid or invalid-temporarily will disable the use of the resource.
Note
An email address can only be set to invalid or invalid-temporarily, if it is not assigned to any queue.
- Comment
- Add additional information to this resource. It is recommended to always fill this field as a description of the resource with a full sentence for better clarity, because the comment will be also displayed in the overview table.