Web Services
In a connected world, a ticket system needs to be able to react to requests from other systems and also to send requests or information to other systems:
CRM systems
Project management systems
Documentation management systems
and many more
The ticket system must be reachable by other services without manual intervention by an agent.
OTOBO supports this requirement by the Generic Interface. It empowers the administrator to create a web service for a specific task without scripting language knowledge. OTOBO reacts on incoming REST or SOAP requests and creates objects or provides object data to other systems transparently.
A web service is a communication method between two systems, in our case OTOBO and a remote system. In its configuration, the operation or invoker determine the direction of communication, and the mapping and transport take care of how the data is received and interpreted.
By configuration, you can define what actions the web service can perform internally (operation), what actions the OTOBO request can perform on a remote system (invokers), how data is converted from one system to the other (mapping), and which protocol is used for communication (transport).
The generic interface is the framework which makes it possible to create web services for OTOBO in a predefined way, using ready-made building blocks that are independent from each other and interchangeable.

Web Service Management Screen
Use this screen to manage web services in the system. A fresh OTOBO installation contains no web service by default. The web service management screen is available in the Web Services module of the Processes & Automation group.
On this page
Manage Web Services
To create a web service:
Click on the Add Web Service button in the left sidebar.
Fill-in the required fields.
Click on the Save button.
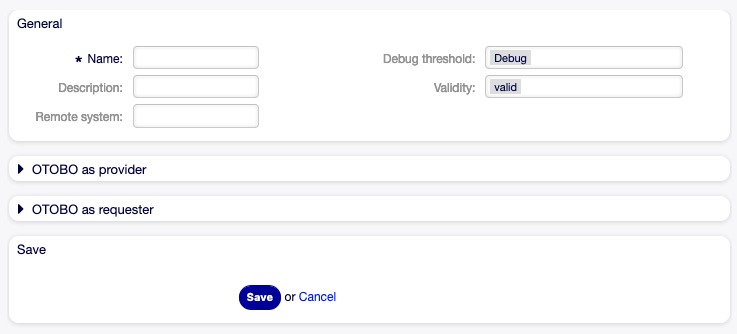
Create New Web Service Screen
To edit a web service:
Click on a web service in the list of web services.
Modify the fields.
Click on the Save or Save and finish button.
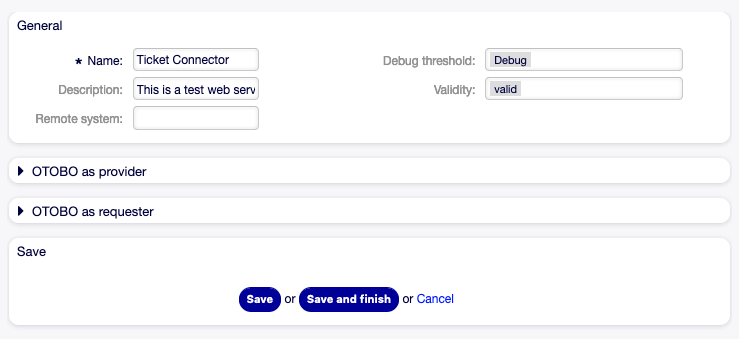
Edit Web Service Screen
To delete a web service:
Click on a web service in the list of web services.
Click on the Delete Web Service button in the left sidebar.
Click on the Delete button in the confirmation dialog.
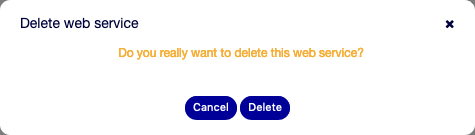
Delete Web Service Screen
To clone a web service:
Click on a web service in the list of web services.
Click on the Clone Web Service button in the left sidebar.
Enter a new name for the web service.
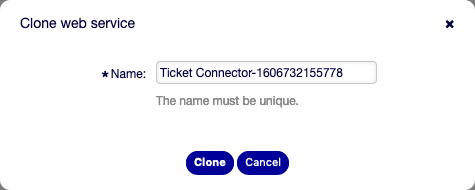
Clone Web Service Screen
To export a web service:
Click on a web service in the list of web services.
Click on the Export Web Service button in the left sidebar.
Choose a location in your computer to save the
Export_ACL.ymlfile to.
Warning
All stored passwords in the web service configuration will be exported in plain text format.
To see the configuration history of a web service:
Click on a web service in the list of web services.
Click on the Configuration History button in the left sidebar.

Web Service Configuration History Screen
To use the debugger for a web service:
Click on a web service in the list of web services.
Click on the Debugger button in the left sidebar.
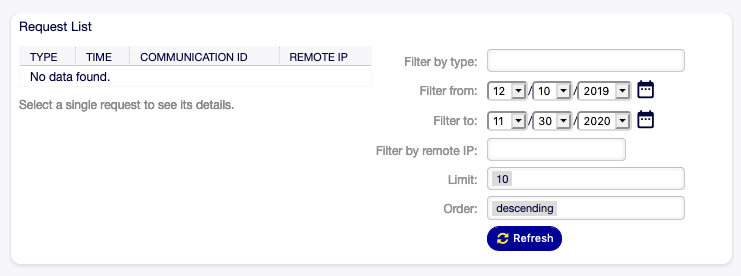
Web Service Debugger Screen
To import a web service:
Click on the Add Web Service button in the left sidebar.
Click on the Import Web Service button in the left sidebar.
Click on the Browse… button in the dialog.
Select a previously exported
.ymlfile.Add a name for the imported web service (optional). Otherwise the name will be taken from the configuration file name.
Click on the Import button.
Web Service Settings
The following settings are available when adding or editing this resource. The fields marked with an asterisk are mandatory.
General Web Service Settings
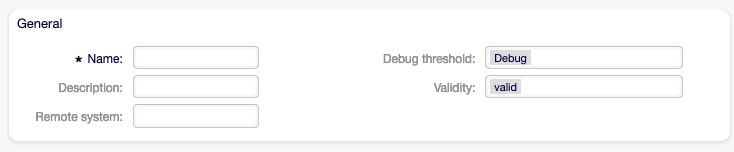
Web Service Settings - General
- Name *
The name of this resource. Any type of characters can be entered to this field including uppercase letters and spaces. The name will be displayed in the overview table.
- Description
Like comment, but longer text can be added here.
- Remote system
The name of the remote system this web service is communicating with. This field is optional and can be used for better organization of web services.
- Debug threshold
The default value is Debug. When configured in this manner, all communication logs are registered in the database. Each subsequent debug threshold value is more restrictive and discards communication logs of lower order than the one set in the system.
Debug threshold levels (from lower to upper):
Debug
Info
Notice
Error
- Validity
Set the validity of this resource. Resources can only be used in OTOBO if this field is set to valid. Setting this field to invalid or invalid-temporarily will disable the use of the resource.
Provider Web Service Settings
Note
To access the otobo webservice, please use the following URL:
https://SERVER-ADDRESS/otobo/nph-genericinterface.pl/Webservice/WEB-SERVICE-NAME/OPERATION
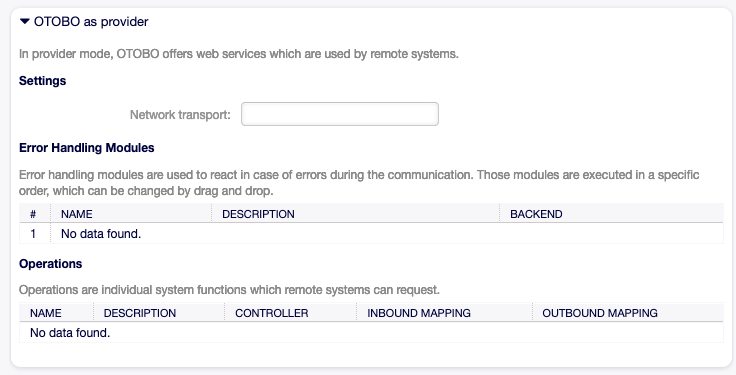
Web Service Settings - OTOBO as Provider
- Network transport
Select which network transport you would like to use with the web service. Possible values are HTTP::REST and HTTP::SOAP.
Note
After selecting the transport method, you have to save the configuration by clicking on the Save button. A Configuration button will be displayed next to this field.
- Configuration
The Configuration button is visible only after a network transport was selected and saved. See the configuration for OTOBO as Provider - HTTP::REST and OTOBO as Provider - HTTP::SOAP below.
- Add Operation
This option is visible only after a network transport was selected and saved. Selecting an operation will open a new screen for configuration.
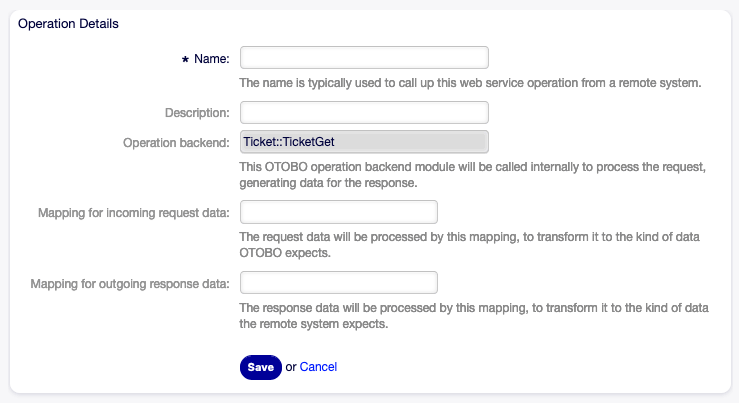
Web Service Settings - OTOBO as Provider - Operation
OTOBO as Provider - HTTP::REST
To use the OTOBO REST interface, choose the network transport method “HTTP::REST”. Save and reload the screen to load the ticket operations.
Web Service Settings - OTOBO as Provider - HTTP::REST
You should now be able to select an operation.
Operations
There are different Ticket Operations which all serve a specific job:
Ticket::TicketCreate
Ticket::TicketGet
Ticket::TicketSearch
Ticket::TicketUpdate
Ticket::TicketHistoryGet
In this example, we are going to use the “Ticket::TicketCreate” operation. Click on “Add Operation” and choose the “Ticket::TicketCreate” operation. Choose a descriptive name, save the operation and go back to the webservice overview.
You now should see a new entry “Route mapping for Operation ‘TicketCreate’”. Enter for example “/TicketCreate”
This will define the route, which will translate to:
https://YOURSERVER/otobo/nph-genericinterface.pl/Webservice/<WEBSERVICE_NAME>/TicketCreate
Click “Save and finish”.
Now you can send a request to the endpoint.
Here is an example using curl:
curl --request POST \
  --header "Content-Type: application/json" \
  --data '{
    "UserLogin": "AgentUser",
    "Password": "Password",
    "Ticket": {
      "Title": "created by Webservice request",
      "QueueID": 5,
      "CustomerUser": "CustomerUser",
      "State": "new",
      "PriorityID": 1
    },
    "Article": {
      "CommunicationChannel": "Email",
      "From": "test@test.de",
      "Subject": "Webservice Create Example",
      "Body": "This was created by a Webservice request!",
      "ContentType": "text/html charset=utf-8"
    }
  }' \
  https://YOURSERVER/otobo/nph-genericinterface.pl/Webservice/<WEBSERVICE_NAME>/TicketCreate
This request is using the least amount of attributes needed to create a new ticket.
- A full list of all attributes needed for operations can be found here:
TicketCreate: https://github.com/RotherOSS/otobo/blob/rel-11_0/Kernel/GenericInterface/Operation/Ticket/TicketCreate.pm#L77
TicketUpdate: https://github.com/RotherOSS/otobo/blob/rel-11_0/Kernel/GenericInterface/Operation/Ticket/TicketUpdate.pm#L77
TicketSearch: https://github.com/RotherOSS/otobo/blob/rel-11_0/Kernel/GenericInterface/Operation/Ticket/TicketSearch.pm#L70
TicketHistoryGet: https://github.com/RotherOSS/otobo/blob/rel-11_0/Kernel/GenericInterface/Operation/Ticket/TicketHistoryGet.pm#L67
OTOBO as Provider - HTTP::SOAP
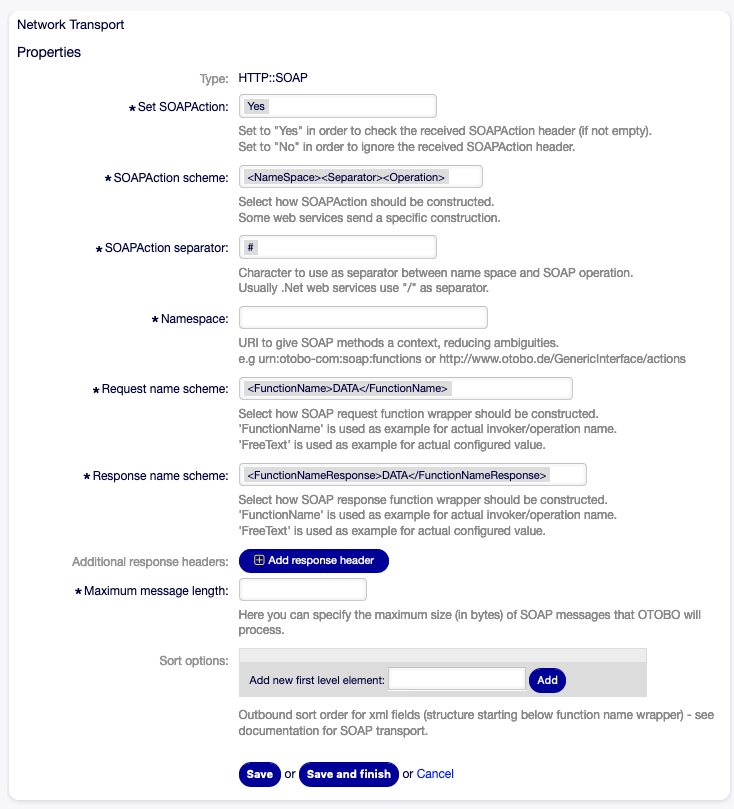
Web Service Settings - OTOBO as Provider - HTTP::SOAP
Requester Web Service Settings
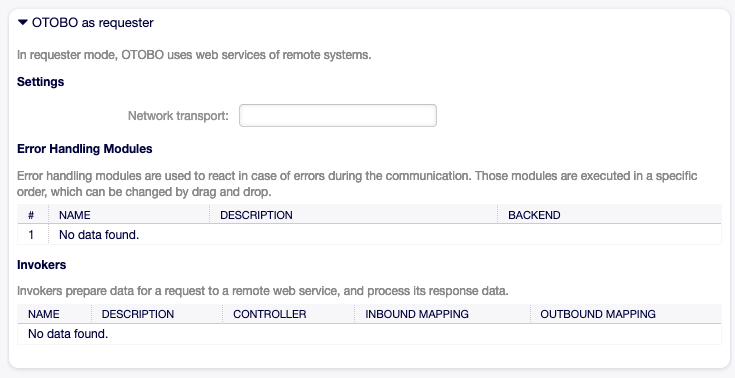
Web Service Settings - OTOBO as Requester
- Network transport
Select which network transport would you like to use with the web service. Possible values are HTTP::REST and HTTP::SOAP.
Note
After selecting the transport method, you have to save the configuration by clicking the Save button. A Configuration button will be displayed next to this field.
- Configuration
The Configuration button is visible only after a network transport was selected and saved. See the configuration for OTOBO as Requester - HTTP::REST and OTOBO as Requester - HTTP::SOAP below.
- Add error handling module
This option is visible only after a network transport was selected and saved. Selecting an operation will open a new screen for its configuration.
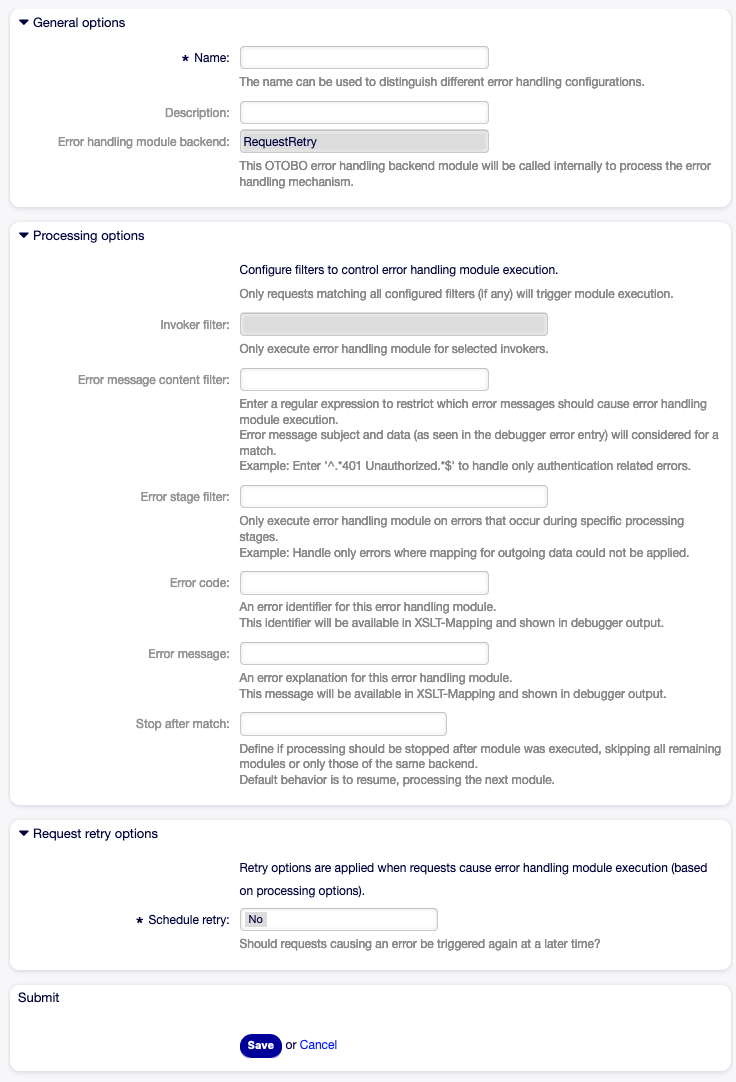
Web Service Settings - OTOBO as Provider - Error Handling Module
OTOBO as Requester - HTTP::REST
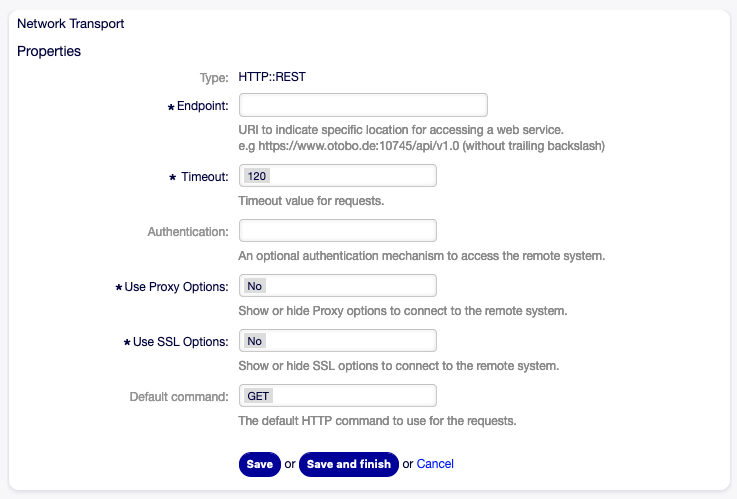
Web Service Settings - OTOBO as Requester - HTTP::REST
OTOBO as Requester - HTTP::SOAP
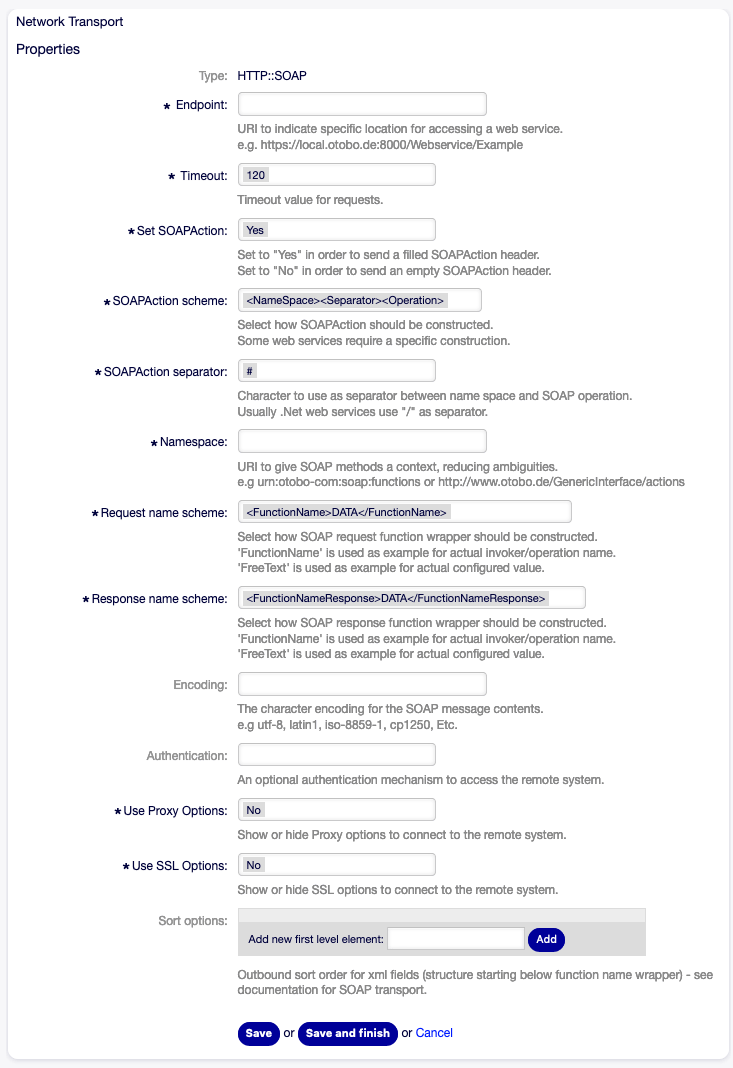
Web Service Settings - OTOBO as Requester - HTTP::SOAP
OIDC-based OAuth2 Authentication
Your system administrator should configure one (or more) OAuth2 Application(s) with their relevant OIDC provider and give you the following configuration details:
the well-known provider metadata discovery url as described in the openid spec Example: ‘https://keycloak:8443/realms/master/.well-known/openid-configuration’
client_idandclient_secretparameters for your OAuth2 Applicationthe
UIDidentifier of an OAuth2 JWT token claim that can be mapped to an OTOBO UserLogin identifier. Usual values include ‘sub’, ‘email’, or ‘uid’. Use ‘sub’ if in doubt.
If your planning to use functional accounts (aka System Users) to authorize outgoing API calls triggered by OTOBO:
the
grant_typewhich will be one of: ‘client_credentials’ or ‘password’ or ‘authorization_code’. if grant_type is ‘password’, you will also get username/password credentialsoptionally, a set of
scopeparameters to use. When using OIDC this likely will include ‘openid’optionally, a set of
resourceids to use.
Important
If you are using the ‘authorization_code’ flow, which will redirect your browser to the Provider login page to authenticate,
the OIDC Provider will redirect you back to your OTOBO instance when the authentication was successful.
For this to work the ‘redirect_uri’ that points back to you OTOBO instance must be an allowed redirect_uri configured for your OAuth2 OIDC application.
The generated URL will be
http(s)://your-otobo.fqdn/otobo/index.pl?Action=AdminOAuthTokenStore&Subaction=OAuth'.
Note this is in addition to the Login redirect_uri which usually is
http(s)://your-otobo.fqdn/otobo/index.pl?Action=Login'.
Some Provider allow simple wildcards in the redirect_uri setting, like http(s)://your-otobo.fqdn/otobo/index.pl* - Please
consult your OIDC Provider documentation for details.
OTOBO as Provider
For incoming OAuth2 API calls, OTOBO has to authenticate the incoming OAuth2 Tokens and map them to an OTOBO user. For API calls this works using the same Authentication Modules (‘AuthModule’ in Config.pm) as used for Login via OpenID Connect. If you already using OTOBO for OIDC based login, you should already have a valid OIDC configuration like from the example above and you are all set.
Otherwise, in case you are not using OIDC for Login, but still want to use OIDC for API calls, or if you want to use a OIDC provider for API calls different from your default OIDC configuration used for login, add an additional AuthModule for OIDC.
Refer to the examples for configuring OIDC that come with your OTOBO installation.
The examples are in Kernel/Config/Defaults.pm line 518ff, and this needs to be configured in Config.pm:
# This is an example configuration for authorization via OpenIDConnect
# see https://openid.net/specs/openid-connect-core-1_0.html
 $Self->{AuthModule} = 'Kernel::System::Auth::OpenIDConnect';
 # Define the authentication flow, currently supported are the authorization code flow...
 $Self->{'AuthModule::OpenIDConnect::AuthRequest'}->{ResponseType} = [ 'code' ];
 # Define the additional scope (openid is added automatically and does not need to be
 # defined here). Make sure to add everything you want to interpret later.
 $Self->{'AuthModule::OpenIDConnect::AuthRequest'}->{AdditionalScope} = [
     qw/profile email/
 ];
 # Set the ClientID and Redirect URI exactly as defined on the authorization server
 # for the latter the Action must be "Login"
 $Self->{'AuthModule::OpenIDConnect::Config'}{ClientSettings} = {
     ClientID    => 'abc123',
     RedirectURI => 'https://my.otobo.server/otobo/index.pl?Action=Login',
 };
 # For the authorization code flow the client secret has to be provided
 $Self->{'AuthModule::OpenIDConnect::Config'}{ClientSettings}{ClientSecret} = 's3cr3t';
 # Provide the URL of the well-known openid-configuration of the OpenID provider
 $Self->{'AuthModule::OpenIDConnect::Config'}{ProviderSettings} = {
     OpenIDConfiguration => 'https://keycloak:8080/auth/realms/MyRealm/.well-known/openid-configuration',
     TTL                 => 60 * 30,      # optional: time period the extracted openid-configuration is cached
     Name                => 'Intern4',    # optional: necessary only if one needs to differentiate between User and CustomerUser configuration e.g.
     SSLOptions          => {             # if special ssl options are needed; SSLVerifyHostname => 0 and SSLVerifyMode => 0 are also possible but should only be used for testing purposes
         SSLCertificate => 'SSL_cert_file',     # client certificate
         SSLKey         => 'SSL_key_file',      # client cert key
         SSLPassword    => 'SSL_passwd_cb',     # password for client cert key
         SSLCAFile      => 'SSL_ca_file',       # CA certificate
         SSLCADir       => 'SSL_ca_path',       # CA cert directory
     },
 };
 # Set the token claim to be used as identifier
 $Self->{'AuthModule::OpenIDConnect::UID'} = 'sub';
 # Some optional additional settings
 $Self->{'AuthModule::OpenIDConnect::Config'}{Misc} = {
     UseNonce   => 1,      # add a nonce to request and token (this is primarily important for the implicit flow where it is enabled by default)
     RandLength => 22,     # length for state and nonce random strings - default: 22
     RandTTL    => 60 * 5, # valid time period for state and nonce (roughly the time a user can take to authenticate) - default: 300 s
     Leeway     => 2,      # leeway for small time differences between the OTOBO server and the OpenID provier - default: 2 s
 };
 # Optionally enable user authorization via the id token - hashes can be used for complex claims
 $Self->{'AuthModule::OpenIDConnect::RoleMap'} = {
     TokenAttribute => {
         TokenRole1 => 'OTOBORole1',
         TokenRole2 => 'OTOBORole2',
     },
     TokenAttribute2 => {
         abc123 => {
             TokenRole1 => 'OTOBORole1',
             TokenRole3 => 'OTOBORole3',
         }
     },
 };
 # Optionally enable user creation - this currently does not support complex claims; email is mandatory
 $Self->{'AuthModule::OpenIDConnect::UserMap'} = {
     email       => 'UserEmail',
     given_name  => 'UserFirstname',
     family_name => 'UserLastname',
 };
 # For debugging purposes and to help with building the RoleMap e.g. you can dump all IDTokens received to the log
 $Self->{'AuthModule::OpenIDConnect::Debug'}->{'LogIDToken'} = 1;
Provider Restrictions
Every valid Token needs to be mapped to a system user. If an API system user does not exist for an incoming webservice call, it will be created provided the Token passes validation and any further restrictions.
To add restrictions which valid tokens are accepted for incoming webservice calls, restrict by these fields in Config.pm:
UserLoginOnly accept tokens of this particular login. This must match the UserLogin value in the OTOBO System (UserLogin attribute of the User entity).
ScopeA space separated list listing token’s ‘scope’ claims that must be present in incoming tokens to be allowed
AudienceA space separated list listing token’s ‘aud’ claims that must be present in incoming tokens to be allowed
AuthorizedPartySimple identifier that must match the token’s ‘azp’ claim to be allowed
Usually, you would either restrict to a specific user login, or to a combination of the other values, depending on your needs.
Example for Config.pm:
$Self->{'AuthModule::OpenIDConnect::Webservice::Restrictions'} = {
     UserLogin => '',
     Scope => '',
     AuthorizedParty => '',
     Audience => ''
};
Provider Example
With above configuration for Providers in place, follow these steps to set up a Test Provider Webservice in OTOBO:
Navigate to Webservices in Admin UI
Select Add New Webservice and give it Name and Description of ‘Test’
Under OTOBO as Provider, select ‘HTTP::REST’ as Transport
Click Save
Add an operation and choose ‘Ticket::TicketGet’
Set Name and Description fields to ‘TicketGet’
Choose ‘Simple’ for both mapping types
Click Save and Finish
Click again on the previous button to configure Network Transport: HTTP::REST
Enter ‘/GetTicket/:TicketID’ for the route mapping
Select ‘GET’ as the single valid request method
Click Save and Finish
At this point OTOBO should be set up to accept incoming calls with OAuth2 tokens for the /GetTicket/:TikcetID endpoint.
First get a token from your provider.
How that works in practice depends on your OIDC provider and your remote setup,
but for testing a curl call with client_credentials grant type might look similar to this example (Keycloak):
curl --request GET \
  --silent \
  --data 'client_id=someapi' \
  --data 'client_secret=s3cr3t' \
  --data 'username=test1@example.com' \
  --data 'password=test' \
  --data 'grant_type=password' \
  --data 'scope=openid' \
  'https://keycloak:8443/realms/master/protocol/openid-connect/token' \
| jq
outputs:
{
  "access_token": "eyJhbG .....",
  "expires_in": 60,
  "refresh_expires_in": 1800,
  "refresh_token": "eyJh...",
  "token_type": "Bearer",
  "id_token": "eyJhb...",
  "not-before-policy": 0,
  "session_state": "3d45911d-4ea5-42a8-814c-133cba55bf8f",
  "scope": "openid email profile roles"
}
You should receive at least an access_token, whether you also get refresh_token and id_token depends on your provider settings.
In most cases you would use the access_token to make webservice calls, but in some environments also passing id tokens can make sense.
Now that we have a token, invoke the GetTicket API endpoint we configured above.
Note we pass 1 as the TicketID, which is usually present on all OTOBO system-administrator as it is the ‘Welcome to OTOBO’ test email.
You can pass any TicketID that exists in your system, of course.
curl --request GET \
  --silent \
  --header 'Authorization: Bearer <token from above>'
  'http://otobo.fqdn/otobo/nph-genericinterface.pl/Webservice/Test/GetTicket/1' \
| jq
outputs:
{
  "Ticket": [
    {
      "StateID": 4,
      "LockID": 2,
      "CreateBy": 1,
      "RealTillTimeNotUsed": 0,
      "UntilTime": 0,
      "TypeID": 1,
      "StateType": "open",
      "CustomerUserID": null,
      "ChangeBy": 4,
      "OwnerID": 2,
      "Title": "Hello otobo welcome1",
      "ResponsibleID": 1,
      "QueueID": 2,
      "ServiceID": "",
      "GroupID": 1,
      "EscalationTime": 0,
      "Responsible": "root@localhost",
      "TicketID": 1,
      "EscalationSolutionTime": 0,
      "State": "open",
      "CustomerID": null,
      "EscalationUpdateTime": 0,
      "TicketNumber": "2015071510123456",
      "Age": 3464340,
      "Type": "Unclassified",
      "PriorityID": 3,
      "Created": "2025-03-07 08:38:24",
      "Priority": "3 normal",
      "Queue": "Raw",
      "ArchiveFlag": "n",
      "Owner": "9dd07755-941e-4b84-ac08-4636f036d26c",
      "Changed": "2025-04-15 07:53:31",
      "SLAID": "",
      "EscalationResponseTime": 0,
      "Lock": "lock",
      "TimeUnit": 0,
      "UnlockTimeout": 1744703611
    }
  ]
}
OTOBO as Invoker
Whereas OTOBO as Provider only has to validate incoming OAuth2 tokens, in order to make outgoing calls as Invoker OTOBO needs to obtain and manage OAuth2 tokens for one or more functional accounts. Functional accounts for Invokers and their tokens can be managed via the dedicated Admin UI module OAuth Functional Accounts. Unlike Providers for incoming calls, which use the OIDC Profile configured for authentication, the outgoing (Invoker) Webservices require a dedicated OIDC Profile setup, which can be done in another dedicated Admin UI module named OIDC Profile Management. First, configure an OIDC Provider Profile:
In the Admin UI, navigate to OIDC Profile Management
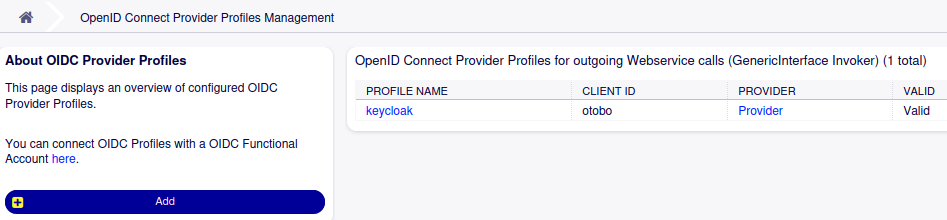
To create a new Profile, choose Add from the left navigation bar.
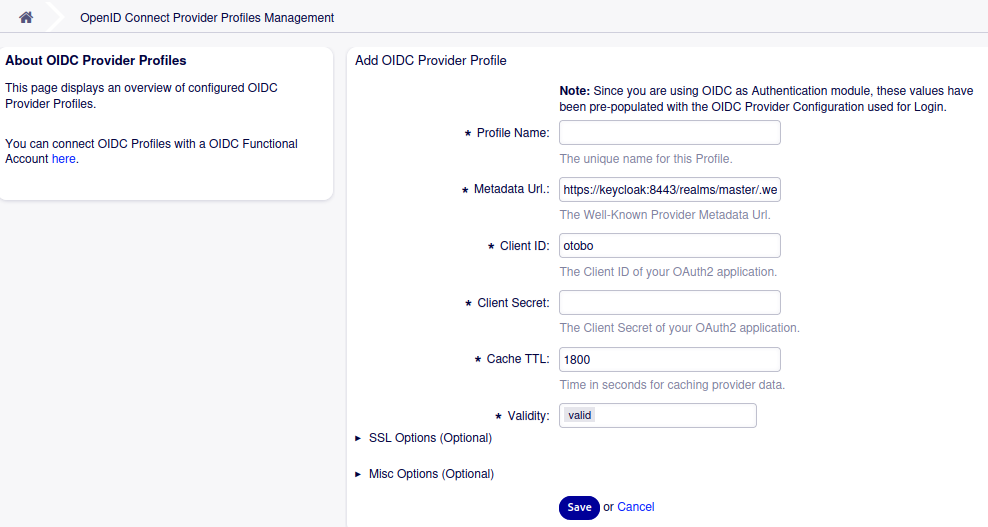
If you are already using OIDC for Login, some values will be pre-populated. You have to provide a valid, unique Profile name and also provide the OAuth2 application client_secret value, which is not pre-populated for security reasons. Usually you can keep all the defaults, especially for the optional SSL and Misc. settings.
Now that we have an OIDC Provider Profile, we can set up a Functional Account. There can be more than one Functional Account per Profile.
In the Admin UI, navigate to OAuth Functional Accounts
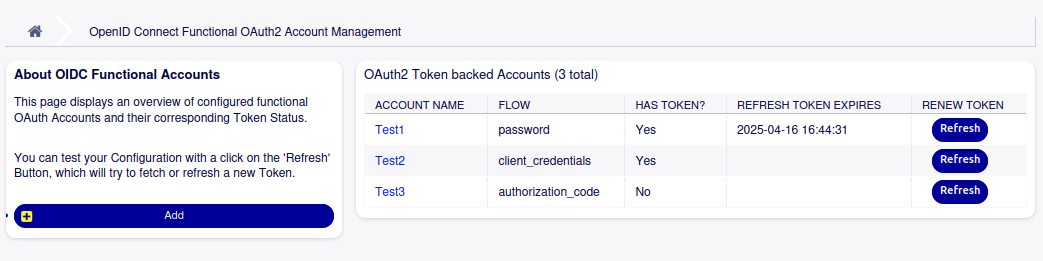
To create a new Account, choose Add from the left navigation bar.
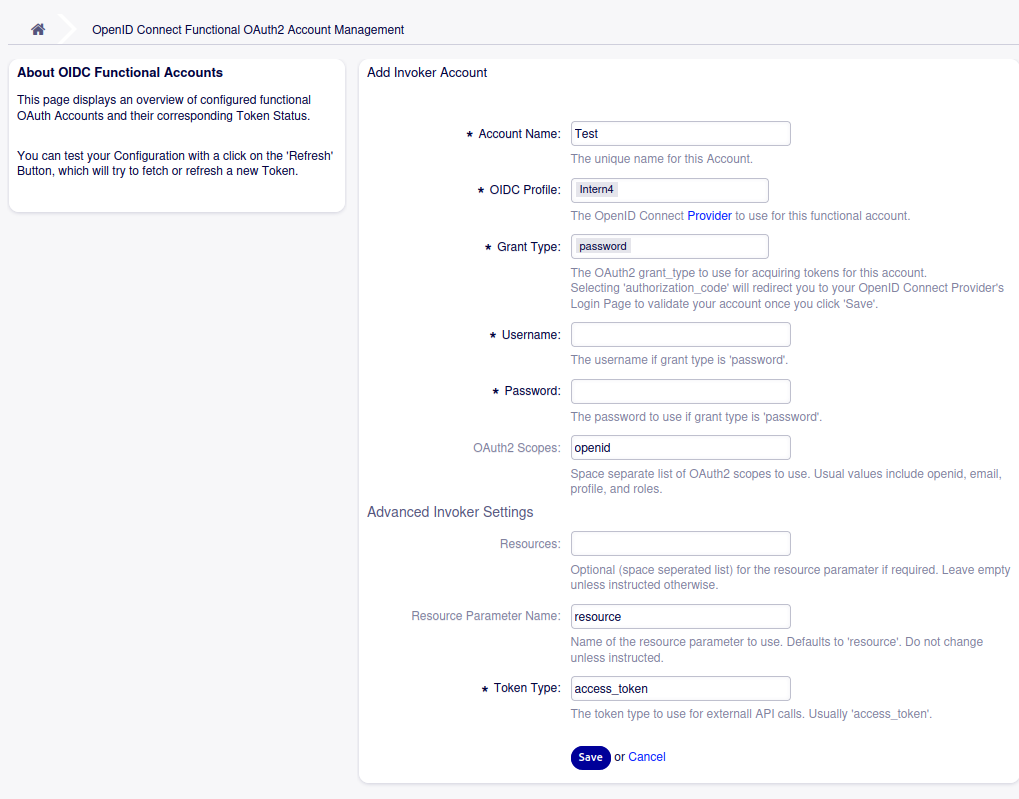
Here you give your account a Name and choose one of the OIDC Provider profiles configured earlier.
Choose the GrantType as instructed by your system administrator, and provide the Scope parameter as required.
Scope will often contain openid and offline_access, other common values are email and profile.
In the Advanced section you can configure additional details, if needed:
ResourcesA space-separated list of resource ids to request access for, not used in all OIDC environments.
ResourceParamNameUsually ‘resource’, but can be overridden here
TokenTypeUsually ‘access_token’, but in some environments ‘id_token’ may be used
Only change advanced settings if instructed by your system administrator.
Invoker Example
Assuming you have configured at least one functional account for Invokers as per above paragraph, we can now configure a Test Invoker Webservice.
Navigate to Webservices in Admin UI
Select Add New Webservice and give it Name and Description of ‘Test’
Under Ootobo as Requester, select ‘’HTTP::REST’ as Transport
Click Save
Under Invokers, select the ‘Generic::Passthrough’ option from the dropdown
Set Name and Description fields to ‘Passthrough’
Choose ‘Simple’ for both mapping types
Click Save
Under Add Event Trigger, choose ‘Ticket’ and ‘ArticleEdit’, remove the checkbox labeled ‘Asynchronous’ and click the circled plus sign (+)
Click Save and Finish
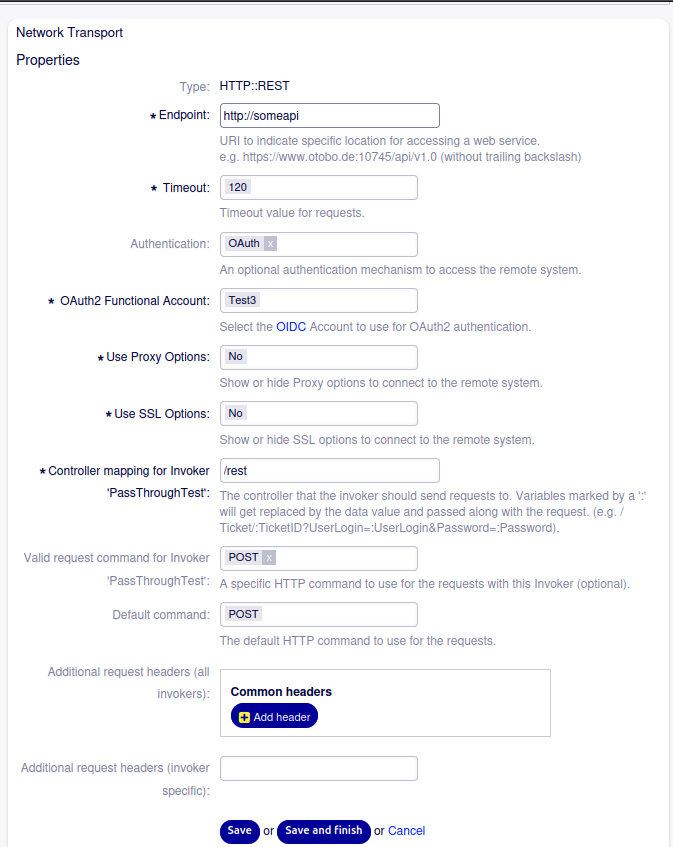
Click the button to configure Network Transport: HTTP::REST
Enter the FQDN of the remote system to call, eg ‘http://echoservice.mycompany.net’, without trailing slash, under Endpoint
From the Authentication dropdown choose ‘OAuth’
Select one of the functional accounts to use from the OAuth2 Functional Account dropdown
Provide the HTTP path for the endpoint to call, eg ‘/rest/api/endpoint’ under Controller Mapping
Select ‘POST’ as value for valid request commands
Click Save and Finish
At this point, OTOBO should try to make an outgoing HTTP API call every time an article in a ticket gets updated, and automatically attach an OAuth2 Bearer Token to the request in the Authorization HTTP header.
To try it out:
Select a ticket
Add a note
Modify the body of the note
Everytime you modify the note, your API endpoint at http://echoservice.mycompany.net/rest/api/endpoint now should receive a POST request with the article data as JSON payload in the post body.
Debugging Webservice Calls
Please note that Webservice calls using OAuth2 tokens can be debugged as usual using the built in OTOBO webservice Debugger. To open the debugger for a specific webservice, navigate to WebServices in the Admin UI, choose the desired webservice, and click on Debugger in the lefthand navigation bar.
Cronjob for updating refresh_tokens
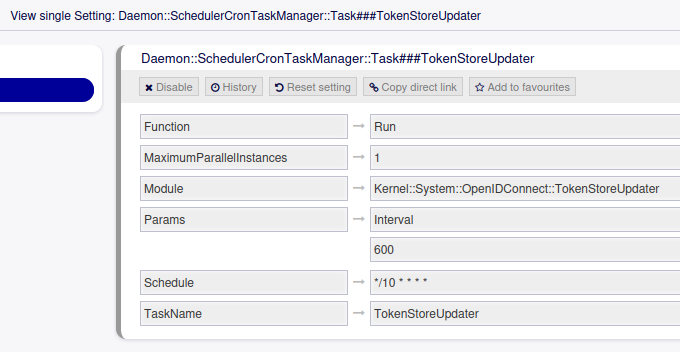
The Cron job that keeps OAuth2 tokens up to date by making regular use of refresh_tokens ca be configured in the System Settings under the key Daemon::SchedulerCronTaskManager::Task###TokenStoreUpdater.
By default the cronjob executes once very 60 minutes.
In case your refresh_tokens expire sooner than 60 minutes, you’ll need to adapt.
The only parameters to tune are the Cron Schedule expression itself, and the Interval parameter.
The cron expression can be any valid cron expression, examples include:
0 * * * *- runs once per hour, at minute 00 0 * * *- runs once per day, at midnight*/10 * * * *- runs every 10 minutes
See https://en.wikipedia.org/wiki/Cron for further details on crontab format.
For the Interval parameter set it to the time period between two scheduled task runs, in seconds.
Running the cronjob once per hour gives you 60 * 60 = 3600 seconds between each run, and thus the Interval parameter should be set to 3600.
Advanced User Import
In case of problems with the automated User import for incoming webservice calls (Provider), there is a console command to manually import a specific User into the system. This console command can also be used for debugging OIDC/OAuth2 problems:
bin/otobo.Console.pl Admin::OAuth2::ImportUser --help
Note
The command comes with a --dry-run option that will only simulate the import,
it will do the actual handshake with the OIDC provider, but it will not actually import the user.
XSLT-Mapping
XSLT stands for “Extensible Stylesheet Language Transformations” and is a language for transforming XML documents into other formats, such as XML, JSON, or plain text like CSV. It can be used in OTOBO to transform incoming or outgoing data structures to match the expected format of the provider or requester. Find the reference here: https://www.w3.org/TR/xslt Aside from the official W3C specification, there are a few specifics when it comes to OTOBO. This chapter will cover the basics of XSLT mapping for OTOBO, and then go into some of the specifics and extensions that are available in OTOBO.
XSLT-Mapping for OTOBO as Provider - HTTP::REST
If OTOBO is used as provider, incoming data often needs to be transformed into a format that OTOBO is able to process.
In this example, we will use the TicketUpdate operation and pass JSON-formatted data.
We will use XSLT to transform the incoming data into a format suitable for the TicketUpdate operation.
Given a Dynamic Field of type Ticket->Text and name “RemoteTicketID”, assume the following incoming data:
{ "incidentID" : "12345", "incidentTitle" : "Test Ticket" }
The data is send via POST to an TicketUpdate operation which is mapped to
https://yourfqdn/otobo/nph-genericinterface.pl/Webservice/Test/TicketUpdate/:TicketID
and you call it like this to update the Ticket with ID 1:
curl --request POST \
  --verbose \
  --header "Content-Type:application/json" \
  --data '{ "incidentID" : "12345", "incidentTitle" : "Test Ticket" }' \
  'https://yourfqdn/otobo/nph-genericinterface.pl/Webservice/Test/TicketUpdate/1?UserLogin=xouruser&Password=yourpass'
We can save the data in the Dynamic Field using XSLT mapping as follows:
<xsl:stylesheet version="1.0" xmlns:xsl="http://www.w3.org/1999/XSL/Transform">
   <xsl:template match="/RootElement">
      <RootElement>
         <TicketID><xsl:value-of select='/RootElement/TicketID' /></TicketID>
         <UserLogin><xsl:value-of select='/RootElement/UserLogin' /></UserLogin>
         <Password><xsl:value-of select='/RootElement/Password' /></Password>
         <DynamicField>
            <Name>RemoteTicketID</Name>
            <Value><xsl:value-of select='/RootElement/incidentID' /></Value>
         </DynamicField>
      </RootElement>
   </xsl:template>
</xsl:stylesheet>
Here, TicketID, UserLogin and Password are just copied over, but the incidentID value gets transformed into a structure OTOBO is able to process.
Extended Type Hints for XSLT Mapping
Extended XSLT mapping can be enabled on the XSLT Mapping Editor page.
If enabled, the resulting JSON type can be forced by specifying an otoboXslType XML attribute.
Possible values for that attribute are int, bool, float, and array.
Assume an OTOBO Webservice requester that is triggered by an ArticleEdit event (synchronously), using the Generic::Passthru Invoker, and a custom outgoing XSLT mapping as follows:
<xsl:stylesheet version="1.0" xmlns:xsl="http://www.w3.org/1999/XSL/Transform">
 <xsl:output omit-xml-declaration="yes" indent="yes"/>
 <xsl:strip-space elements="*"/>
 <xsl:template match="/">
  <RootElement>
   <TicketID otoboXslType="bool"><xsl:value-of select="/RootElement/TicketID" /></TicketID>
   <ArticleID otoboXslType="int"><xsl:value-of select="/RootElement/ArticleID" /></ArticleID>
   <Event otoboXslType="array"><xsl:value-of select="/RootElement/Event" /></Event>
  </RootElement>
 </xsl:template>
</xsl:stylesheet>
This example considers three data points: ‘TicketID’, ‘ArticleID’, and ‘Event’.
Note the type hint attributes named otoboXsltType that have been added.
boolForce the value to be represented as boolean values in the resulting JSON. The empty string, the number
0, the stringZero, and the string “false” (case-insensitive) will be treated asfalse, all other values will be transformed totrueintChange type of value put into JSON from String to Integer. It uses the Perl
int()function, the usual caveats apply. The function consumes characters left to right and stops consuming at the first non-numeric character, so “42” and “42abc” will both be transformed to the integer 42, while “abc42” will be transformed to 0. However, E notation is fully supported, so “1e3” will be transformed to 1000, and “-300e-2” will be transformed to -3. The empty string will be transformed to 0.floatChange type of value put into JSON from String to Float. It accepts
.as the decimal character and cuts at,. E notation is fully supported, so “1e-3” will be transformed to 0.001.arrayForce the element to be represented as a JSON array, even if it only contains 1 element.
arraymay be combined with the other type values, to force both array and a specific type representation (refer to examples below). Note, that an element occurring more than once in the document will already be represented as an array in JSON. Specifyingarrayon that element hat no effect.
This illustrative but artificial example demonstrates the mapping with otoboXslType:
<xsl:stylesheet version="1.0" xmlns:xsl="http://www.w3.org/1999/XSL/Transform">
 <xsl:output omit-xml-declaration="yes" indent="yes"/>
 <xsl:strip-space elements="*"/>
 <xsl:template match="/">
  <RootElement>
   <Test>
     <Sub otoboXslType="array">1</Sub>
     <Item otoboXslType="float">3.2</Item>
     <Thing otoboXslType="array int">1</Thing>
     <Thing otoboXslType="array int">2</Thing>
     <Thing otoboXslType="array int">3</Thing>
       <Array><Item otoboXslType="bool">0</Item></Array>
       <Array><Item otoboXslType="bool">1</Item></Array>
       <Array><Item otoboXslType="bool">false</Item></Array>
   </Test>
  </RootElement>
 </xsl:template>
</xsl:stylesheet>
This results in the following JSON:
{
  "Test": {
    "Item": 3.2,
    "Thing": [ 1,2,3 ]
    "Sub": [ "1" ],
    "Array": [
      { "Item": false },
      { "Item": true },
      { "Item": false }
    ]
  }
}