Kerberos Single Sign On in der OTOBO Docker-Installation
Bitte lesen Sie das Kapitel Installation mit Docker und Docker Compose für grundlegende Informationen über die Installation und Konfiguration von OTOBO. Dieses Tutorial geht davon aus, dass OTOBO mit Docker installiert und konfiguriert wurde.
Bemerkung
Im Folgenden sprechen wir von AD (Active Directory). Natürlich funktioniert die Konfiguration von Kerberos auch mit LDAP.
Active Directory User erstellen
Bitte erstellen Sie einen neuen Active Directory Benutzer mit den folgenden Einstellungen und speichern Sie die markierten Einstellungen:
Bemerkung
Bitte verwende als Benutzernamen nur diese Syntax: HTTP/fqdn.from.your.otobo.de. fqdn.from.your.otobo.de muss ein A-Record DNS-Eintrag sein, kein CNAME! Im nächsten Schritt ist es auch möglich, andere URLs für OTOBO zu verwenden, sie müssen dann als CNAME auf unseren oben definierten A-Record zeigen.
Der Benutzername sollte in Großbuchstaben geschrieben sein, da Kerberos ihn auf diese Weise erwartet.
Das Passwort funktioniert nicht zuverlässig mit einigen Sonderzeichen (z.B. ‚&‘).
You have to create a seperate AD user.
You can not use the one that you already use for your LDAP/AD sync.
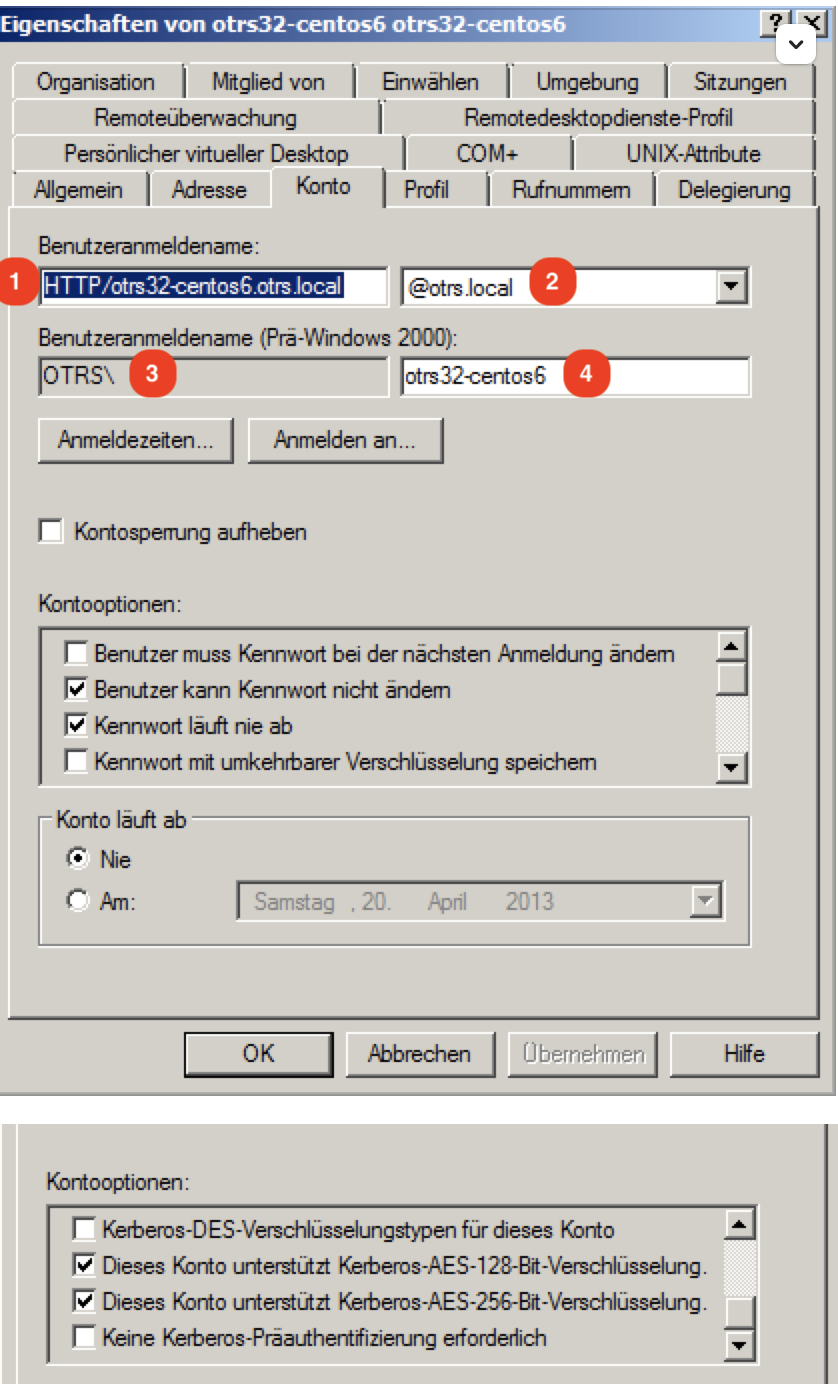
Active Directory Keytab-Datei erstellen
In the next step, we connect to a domain controller of the Active Directory and open a console (cmd) there with administrator privileges. Now we use the tool ktpass.exe to generate the needed keytab file:
sudo ktpass.exe -princ HTTP/otrs32-centos6.otrs.local@OTRS.LOCAL -mapuser OTRS\otrs32-centos6 -crypto All -pass Password -ptype KRB5_NT_PRINCIPAL -out c:\krb5.keytab
-princ = HTTP/otrs32-centos6.otrs.local@OTRS.LOCAL -> Picture Number 1+@+Picture Number 2
-mapuser = OTRSotrs32-centos6 (Benutzername prä Win 2000) -> -> Bildnummer 3++Bildnummer
-pass = Passwort vom Benutzer otrs32-centos6 (Active Directory-Benutzer)
-out = c:/krb5.keytab
Bemerkung
Bitte schreiben Sie die Benutzernamen (@OTRS.LOCAL) immer in Großbuchstaben. Das Passwort darf einige Sonderzeichen nicht enthalten.
Im nächsten Schritt verschieben Sie bitte die Datei krb5.keytab auf den OTOBO-Server:
# Create new directory
sudo mkdir /opt/otobo-docker/nginx-conf

# Move the file krb5.keytab to the new directory (Attention, depending on where you have placed the krb5.conf file, the command below will change.)
sudo mv ?/krb5.keytab /opt/otobo-docker/nginx-conf/krb5.keytab
Erstelle ein neues Volume für deine individuelle nginx-Konfiguration
sudo docker volume create otobo_nginx_custom_config
otobo_nginx_custom_config_mp=$(docker volume inspect --format '{{ .Mountpoint }}' otobo_nginx_custom_config)
sudo docker create --name tmp-nginx-container rotheross/otobo-nginx-webproxy:latest-10_1 (achtung: Versionsnummer)
sudo docker cp tmp-nginx-container:/etc/nginx/templates /tmp
sudo docker cp tmp-nginx-container:/etc/nginx/templates/otobo_nginx-kerberos.conf.template.hidden $otobo_nginx_custom_config_mp/otobo_nginx.conf.template
sudo docker rm tmp-nginx-container
sudo vim docker-compose/otobo-nginx-custom-config.yml
COMPOSE_FILE =>
docker-compose/otobo-nginx-custom-config.yml
NGINX_ENVSUBST_TEMPLATE_DIR=/etc/nginx/config/template-custom
Neue OTOBO .env*-Datei anlegen
Zunächst müssen wir die alte Datei /opt/otobo-docker/.env nach .env.tmp verschieben und eine neue .env-Datei mit den Kerberos-Einstellungen erstellen.
# Stop OTOBO Container if running
cd /opt/otobo-docker
sudo docker-compose down

# create a backup of the old .env file
sudo mv /opt/otobo-docker/.env /opt/otobo-docker/.env.tmp

# create a new backupfile including kerberos settings
sudo cp /opt/otobo-docker/.docker_compose_env_https_kerberos /opt/otobo-docker/.env
Kopiere jetzt deine bestehenden Konfigurationsoptionen in die neue .env-Datei (mindestens OTOBO_DB_ROOT_PASSWORD, OTOBO_NGINX_SSL_CERTIFICATE, OTOBO_NGINX_SSL_CERTIFICATE_KEY) und füge die folgenden Kerberos-Einstellungen hinzu:
# Kerberos keytab
OTOBO_NGINX_KERBEROS_KEYTAB=/opt/otobo-docker/nginx-conf/krb5.keytab

# Kerberos config (Important, please comment out this option like here!)
# In default configuration the krb5.conf file is generated automatically
# OTOBO_NGINX_KERBEROS_CONFIG=/opt/otobo-docker/nginx-conf/krb5.conf

# Kerberos Service Name
OTOBO_NGINX_KERBEROS_SERVICE_NAME=HTTP/otrs32-centos6.otrs.local # -> Picture Number 1

# Kerberos REALM
OTOBO_NGINX_KERBEROS_REALM=ROTHER-OSS.COM -> OTRS.LOCAL # -> Picture Number 2

# Active Directory Domain Controller / Kerberos kdc
OTOBO_NGINX_KERBEROS_KDC=

# Active Directory Domain Controller / Kerberos Admin Server
OTOBO_NGINX_KERBEROS_ADMIN_SERVER=rother-oss.com

# Kerberos Default Domain
OTOBO_NGINX_KERBEROS_DEFAULT_DOMAIN=otrs.local

# add the OTOBO_PROXY_SECRET and set it to a long random string
OTOBO_PROXY_SECRET=
OTOBO starten
Nach der initialen Konfiguration von Kerberos starten wir OTOBO erneut:
# Start OTOBO using docker-compose
sudo docker-compose up -d
In OTOBO angeben, dass die Kerberos-Authentifizierung verwendet werden soll
Falls du AD-Authentifizierung konfiguriert hast, deaktiviere sie (z.B. durch Auskommentieren der entsprechenden Zeilen in deiner Kernel/Config.pm). Die Authentifizierung wird nicht mehr über LDAP stattfinden.
Um die Kerberos-Authentifizierung zu nutzen, nimm die Kerberos-Zeilen aus Kernel/Config/Defaults.pm und füge sie in deine Kernel/Config.pm ein. Zum Beispiel könnten diese Zeilen funktionieren:
$Self->{AuthModule} = 'Kernel::System::Auth::HTTPBasicAuth';

# In case you need to replace some part of the REMOTE_USER, you can
# use the following RegExp ($1 will be new login).
$Self->{'AuthModule::HTTPBasicAuth::ReplaceRegExp'} = '^(.+?)@.+?$';

# enable remote SSO from proxy in OTOBO
$Self->{'AuthModule::HTTPBasicAuth::TrustProxyHeader'} = 1;
$Self->{'WebServer::ProxySecret'} = 'use same long random string as specified in .env file above';
Den Browser so konfigurieren, dass er Kerberos SSO versteht
Damit SSO funktioniert, muss der Browser entsprechend konfiguriert werden.
Chrome, Edge, Internet Explorer, etc.
Fügen Sie eine Seite unter „Lokale oder vertrauenswürdige Seiten“ hinzu und aktivieren Sie „Integrierte Windows-Authentifizierung“ (Internetoptionen).
Firefox
„about:config“ in die Adresszeile von Firefox eingeben
und folgende Einstellungen anpassen:
network.negotiate-auth.trusted-uris = https:// (or https://otobofqdn)
network.negotiate-auth.delegation-uris = http:// (or https://otobofqdn)
Fehlererkennung und Problembehebung
Sollte das Kerberos SSO nicht funktionieren, überprüfen Sie bitte zunächst, ob der NGINX-Container gestartet ist:
# Check Container
sudo docker ps
Im nächsten Schritt überprüfen Sie bitte die NGINX-Logs auf mehr Informationen:
# Check NGINX logs
sudo docker logs otobo_nginx_1 -f
Sollte NGINX laufen, loggen Sie sich bitte in den NGINX-Container ein und überprüfen Sie alle benötigten Dateien:
# Login to the NGINX Container
sudo docker exec -it otobo_nginx_1 bash

# Now please check if the krb5.conf file exists with your needed values
sudo cat /etc/krb5.conf

# Now please check if the krb5.keytab file exists
sudo cat /etc/krb5.keytab

# If not, please quit from the container and copy the file again using docker
sudo docker cp /opt/otobo-docker/nginx-conf/krb5.keytab otobo_nginx_1:/etc/krb5.keytab
Kerberos Fehlerbehebung
# Login to the NGINX Container
sudo docker exec -it otobo_nginx_1 bash
Now you are able to debug the kerberos settings
Examples:
env KRB5_TRACE=/dev/stdout kvno HTTP/otrs32-centos6.otrs.local@OTRS.LOCAL
klist -e
kinit -VV -k -t /etc/krb5.keytab HTTP/otrs32-centos6.otrs.local@OTRS.LOCAL
kinit username@OTRS.LOCAL
In case you stumble upon the issue that apparently the authentication works, but the agent is not yet in the database, then your sync (if implemented) might not work.
An error 52e (First bind failed) indicates that something is wrong with your search user.
This happens if you use the same user for the AD sync and as a SSO user.
Please use seperate AD users for that.
In order to not have to create a new keytab and having to repeat the steps mentioned above, it could be easier to create a new user to use in your AD sync (probably in your Kernel/Config.pm).
Falls SSO nicht richtig funktioniert, stelle sicher: * dass der Benutzer, für den es nicht funktioniert, im Active Directory ist * dass das System in der Domäne ist * dass es ordnungsgemäß als vertrauenswürdige Seite angegeben ist (siehe ‚Browser konfigurieren, um Kerberos SSO zu verstehen‘)